Nail art designs are popular among fashionistas these days. Everyone who loves to work in bright colours or new trendy fashion sense is into nail art. The materials and colours are most easily available and hence, why not try new ones often? These easy nail art designs are beautiful and trendy at the same time. They can brighten up your hands in an instant.
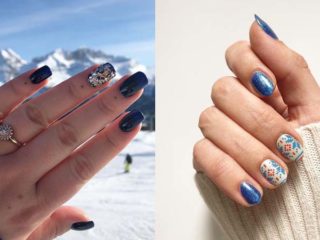
Check what best you like, and hence you can easily do them yourself too, match up with your dresses and occasions. Continue reading this guide to know more about beautiful nail art to try on. These are absolutely loved nail designs and can be done quickly without effort. While many adore these designs check on how you can do it and a guide on these designs here. Do not worry, and a detailed tour will help you figure out these styles!
Simple and Easy Nail Art Designs for Beginners 2023:
Below are the top 100 different types of easy and simple nail art designs that you can try out for various occasions. These are easily done even if you are a beginner. For some of the nail arts, you will need to buy some deco materials which you can buy from special shops. If you have a good hand at drawing then you can try the freehand patterns shown below step by step.
1. Try Sunset Nail Art Design by Using Liquid Sand Nail Polish:
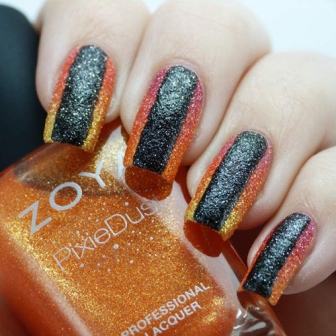
This is awesome and the best among nail art designs that will remind you of night and sunset. And this has been done using Zoya Pixie dust, nail lacquer and sand nail polishes. This new trendy sand finish nail polish gives you a natural sand-type effect in real life. These are available easily in the market and suit most Indian skin tones. However, you may try out this unique nail art using 2 colours of sand nail polishes viz.
- You need black, and glitter sand types of nail polish from the Zoya brand and also orange or yellow colour nail polish.
- It is also better to sponge up a red colour or a pinkish shade polish onto the top portion.
- Use black in the middle. Do not use a top coat for this one.
- That is essential because you do get to see the glitter that gets wasted otherwise with an extra layer of protective topcoat.
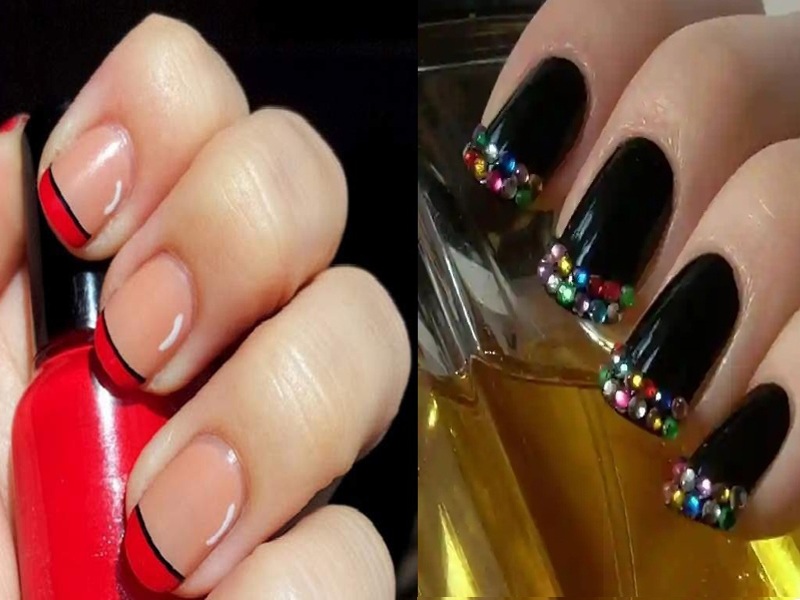
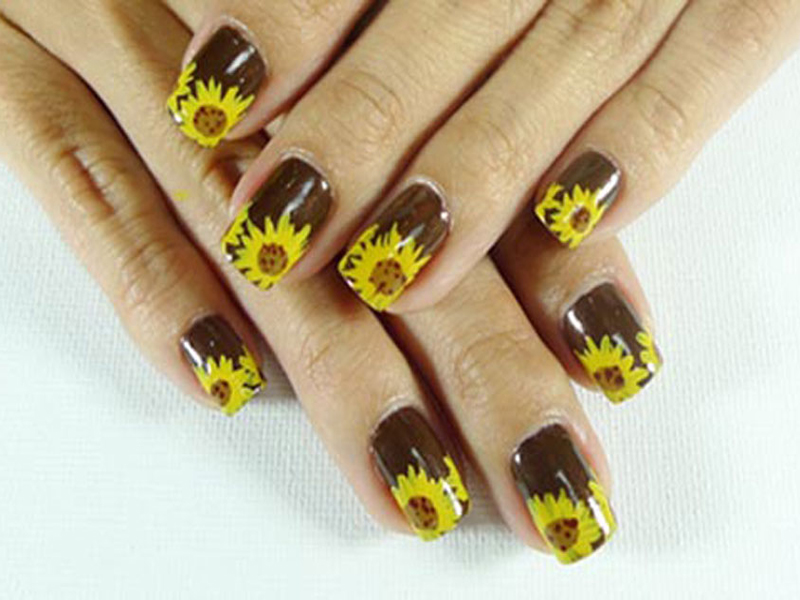
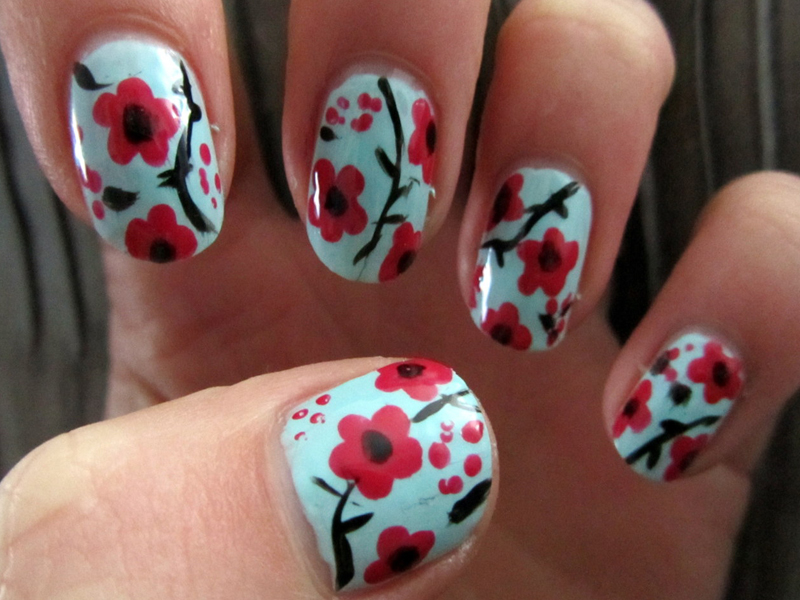
2. Black Floral Nail Art Designs:
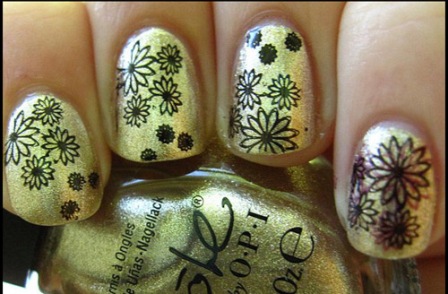
The flowers are all different and unique, but the pattern is similar with four flowers cupped together on each nail at different places. This is, for sure, a cute nail art design. This colour is loved by most women who have fair-toned skin as this is the brightest and gives a summer feel.
- You can try this easy nail art by using golden nail polish as a base and some special black polish.
- Use the special polish to stamp out floral designs from a definite stamping plate.
- You can also use nail stickers to do the same designs.
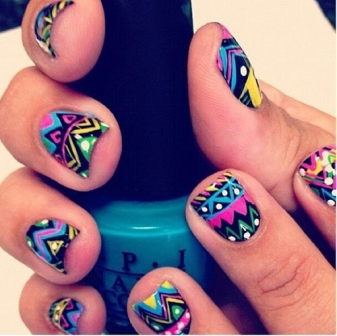
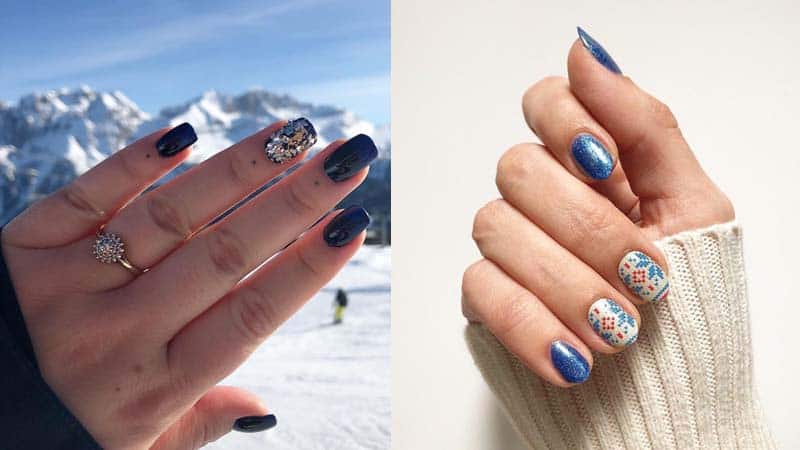
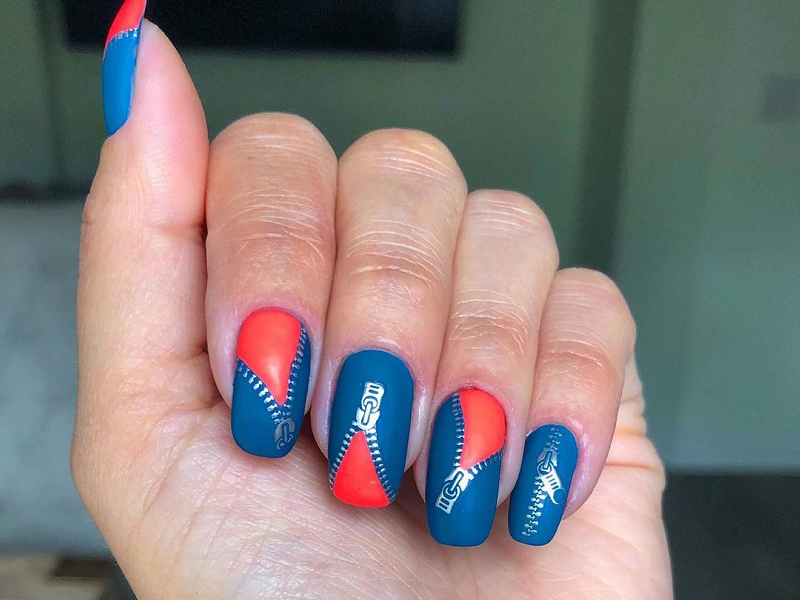
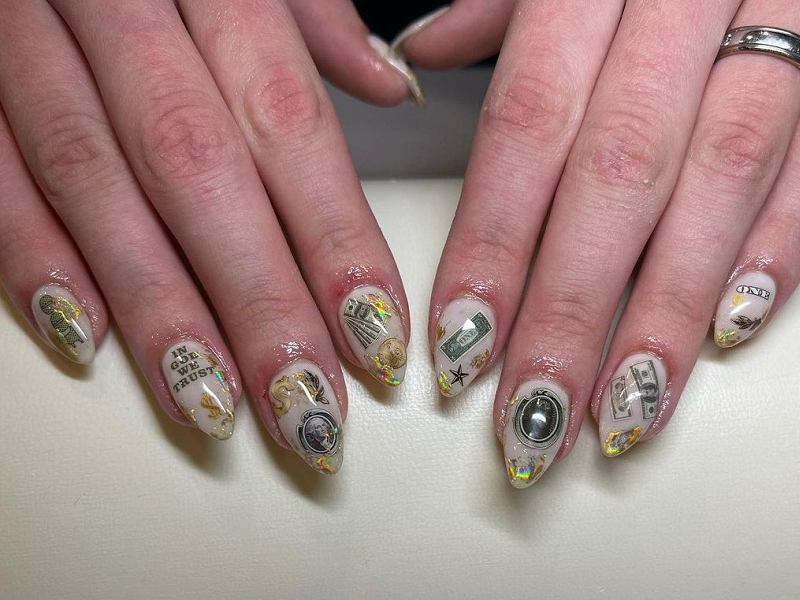
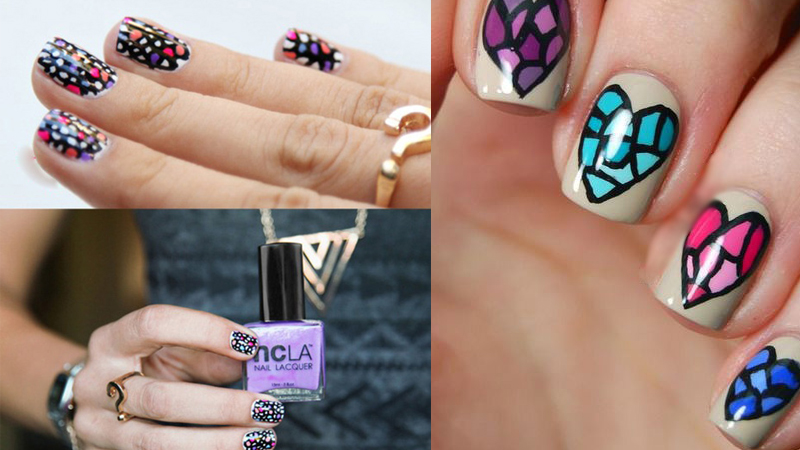
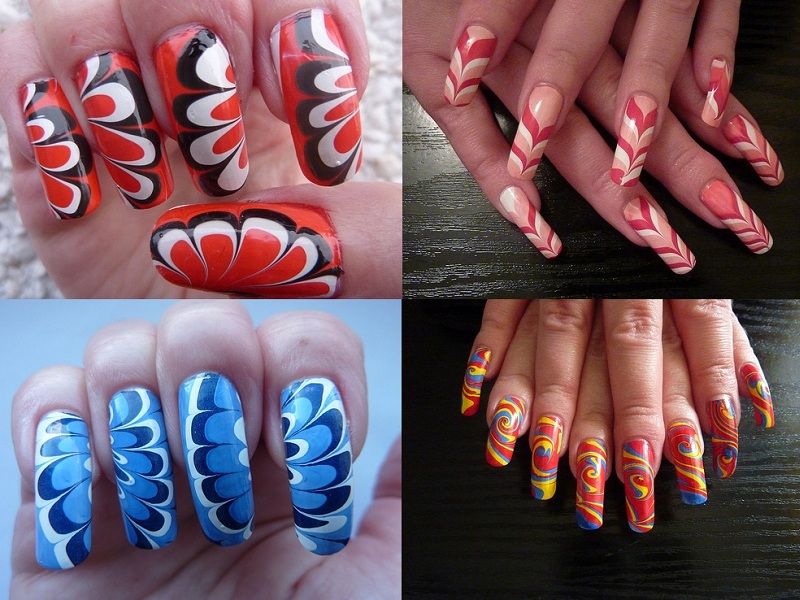
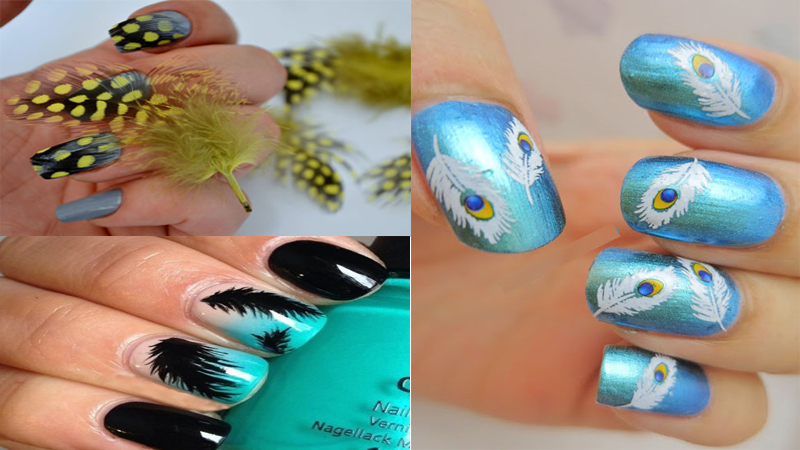
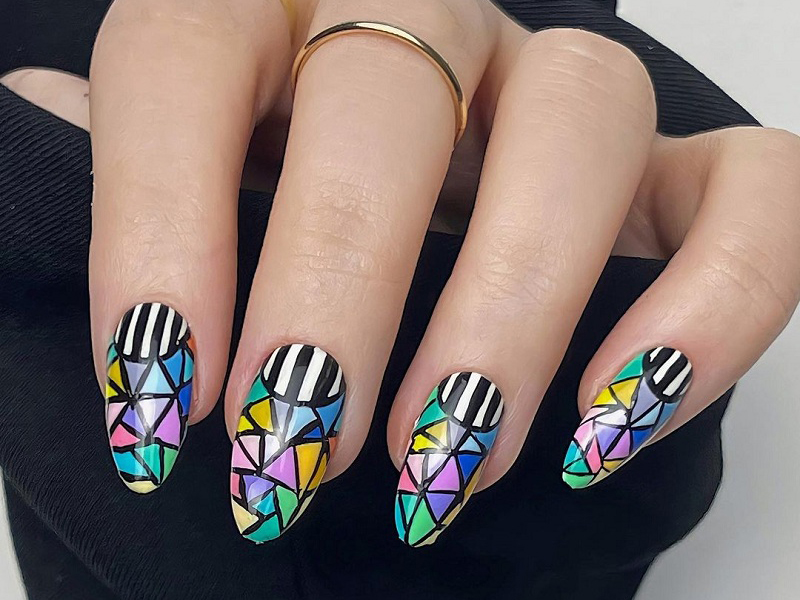
3. Water Decal Designer Nail Art Designs:
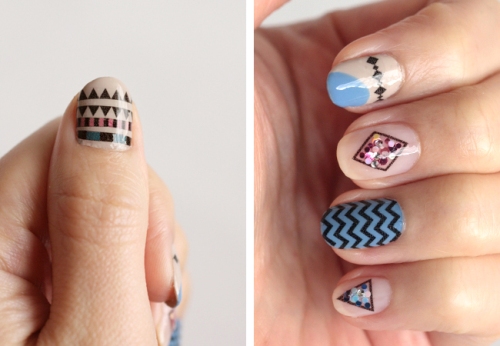
These types of new nail art designs can be created using water decals of the above pattern on white base paint. You must finish this design with a good top coat application; otherwise, your whole effort will be wasted in a short time. The nail paint can have an Aztec colour like this, or you can flaunt your favourite character from any TV show in a teensy form as well, whatever suits you best.
- Take nail polishes of light beige colour and blue, and black colours.
- Those who love bright colours can also use pink.
- Apply in the above patterns and customize as you wish.
- Apply a top coat application for this design.
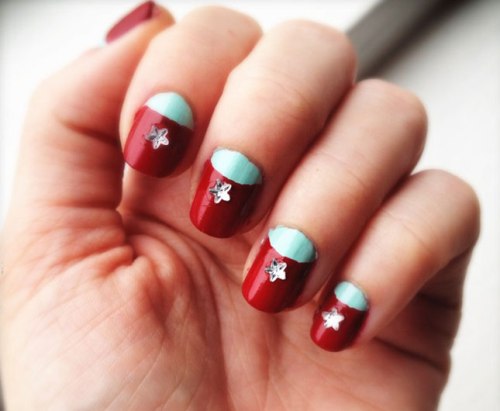
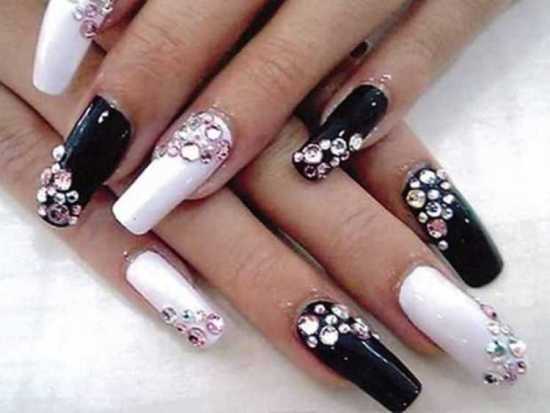
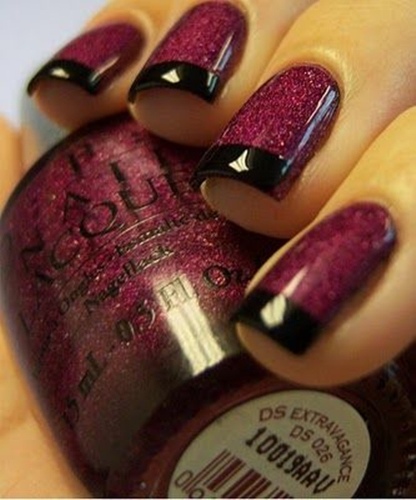
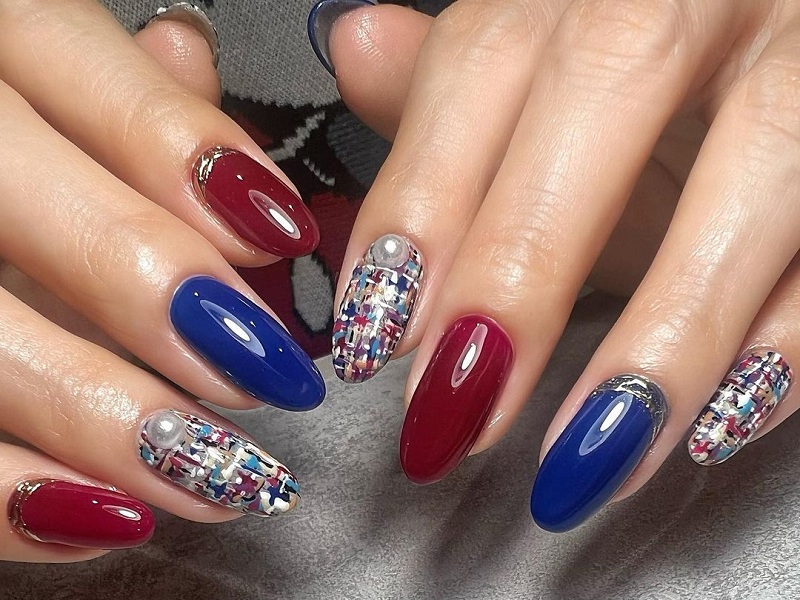
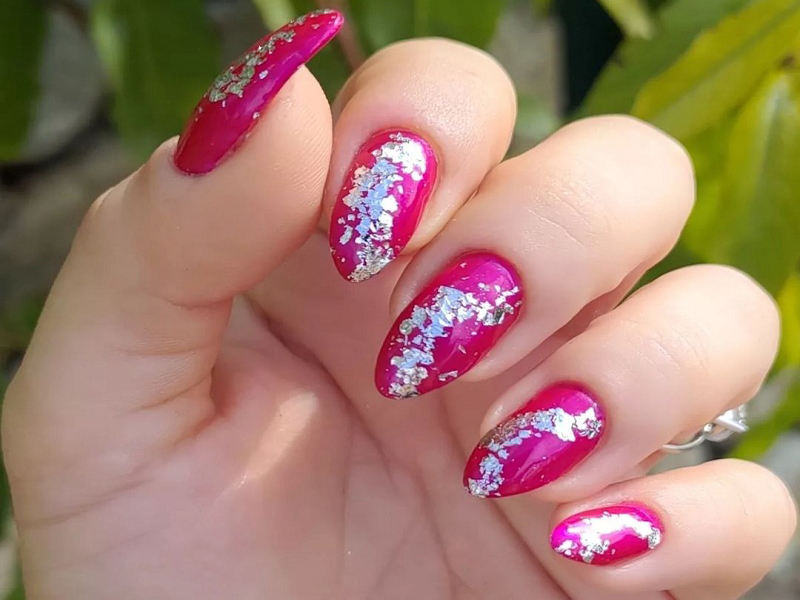
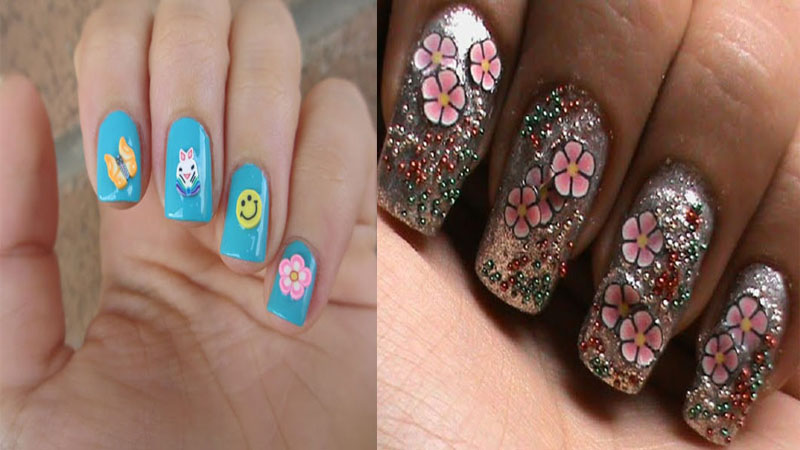
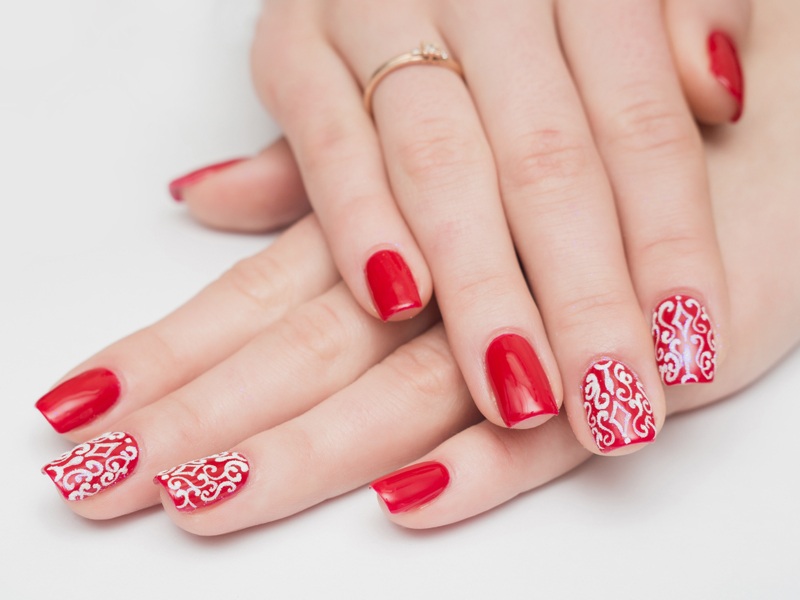
4. Easy Black and Red Bling Sand Nail Art Design:

You can create these easy nail art designs for even short nails or long ones. This can be done by using sand nail polishes in red and black from Zoya. You can additionally create patterns and add some rhinestones for the bling effect. For the nail colour, as you see, two fingers have flowers while the other three don’t, not that it is stealing away the show for any less.
- Take bright red and black colours and apply nail polish as mentioned in the picture.
- Take nail stones and stick them on nails for the bling effect.
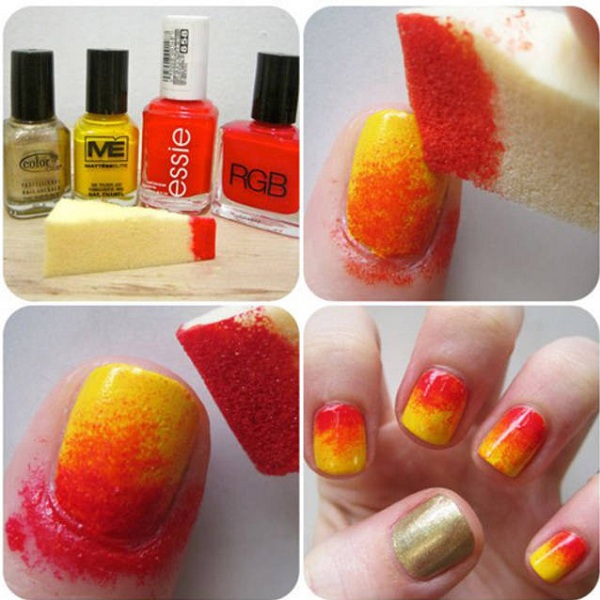
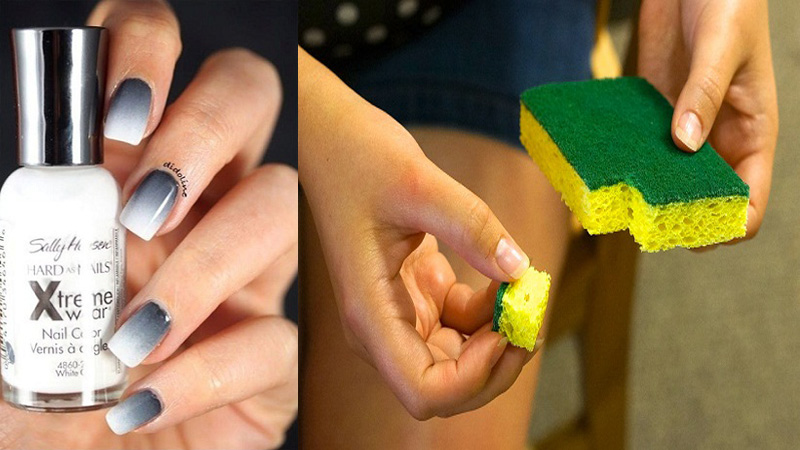
5. Sponge Effect Sunset Nail Art by Using Metal Finish Nail Paint:
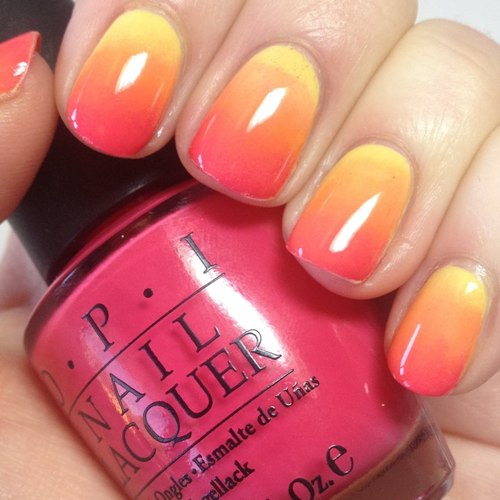
This nail art can be created easily by using three different shimmer finish colours of high-quality nail polishes and a sponge. You will need metal finish nail polish for this nail art.
- Take two metal finish nail polishes and paint nails, as seen in the picture.
- First pain the yellowish colour beneath and fill it up with the orange tone colour.
- Use a top coat to cover and seal this design.
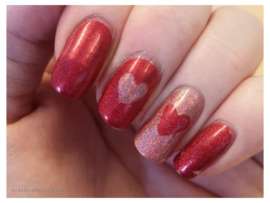
- The effect is very ombre-like, so when you are bored of the same unicolour design, this one is your ticket to standing out for good reasons.
- This can be a look that you take along to the beach for the day.
6. Trio Sand Nail Polish Design:
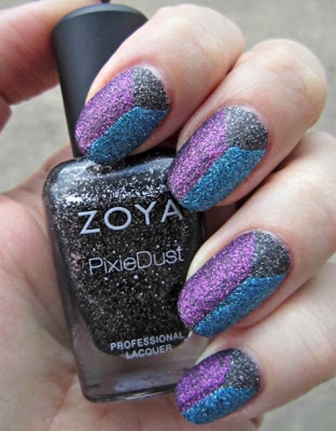
This is another sand finish nail art done using three different sand finish nail polishes from Zoya. You can create this design by using scotch tapes so that one colour doesn’t smudge onto the other. While you might think violet and blue don’t match well with each other, that isn’t the case always, as you see how different this look is and it is equally unique.
- Apply three bright colours of your choice purple, blue and red, which can blend well.
- Take nail polish with sparkles for this special effect.
- Paint, as shown in the picture.
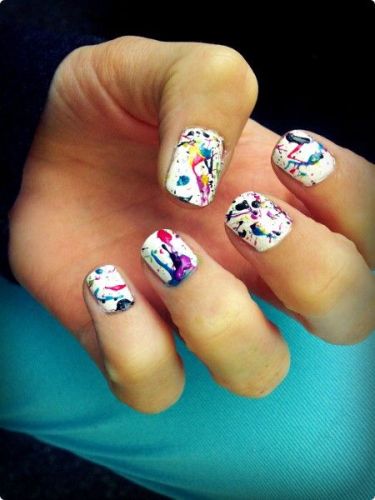
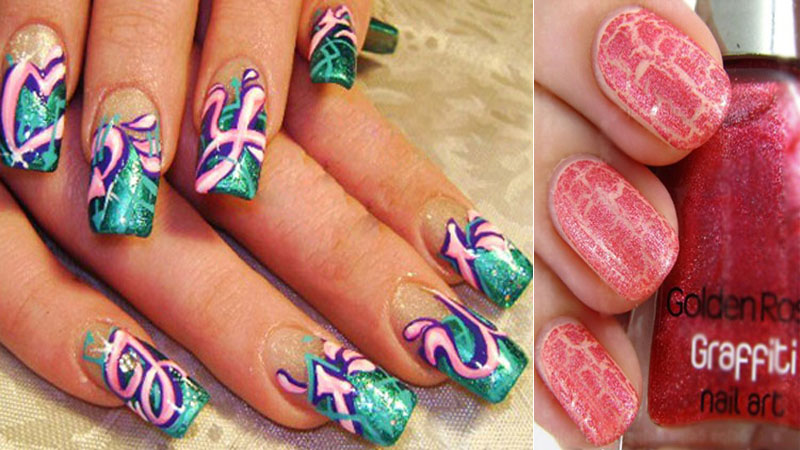
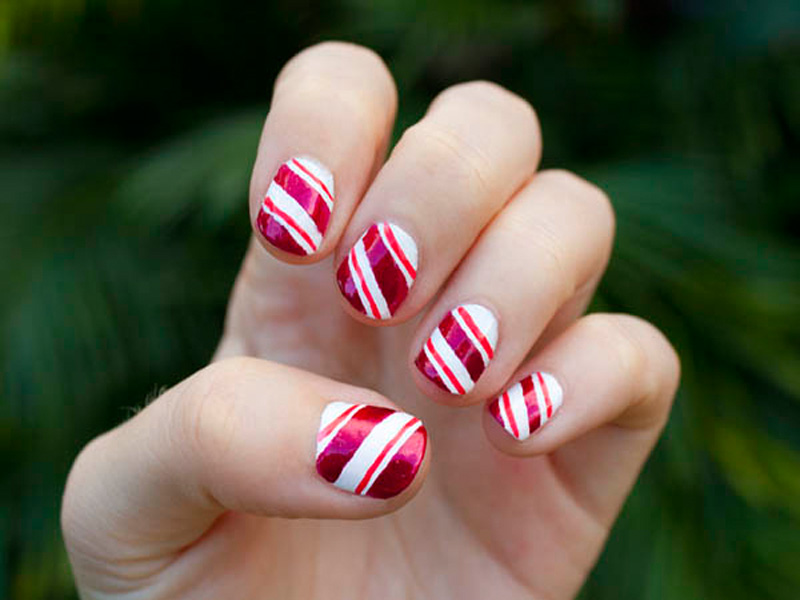
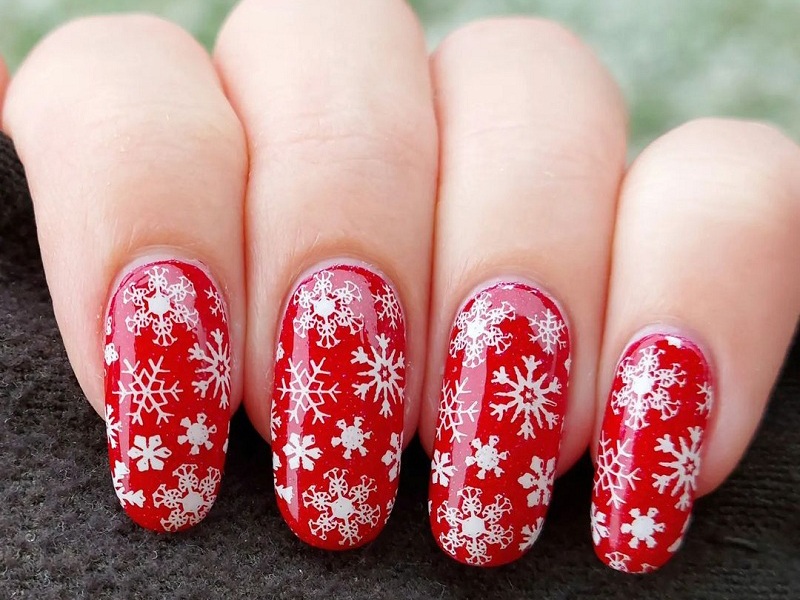
7. Simple Candy Cane Crush Nail Polish Designs:
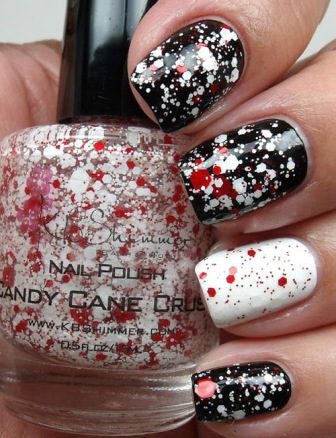
First the bad news, this nail art has been created using KB Shimmer Candy Cane crush nail polish, which has different coloured sequins in it. This nail polish may not be available in India. However, you can create a similar splatter effect with loose nail art sequins or use a nail art brush and split the required colours onto the nails by diluting a little bit of nail polish on a palette mixed with a little bit of nail remover or acetone.
- The choices of colours here are high, and as you can see, the black and white complement each other on a great note.
- Add rhinestones on top of it in case you want more bling.
- Make sure to mix and match these colours for the look.
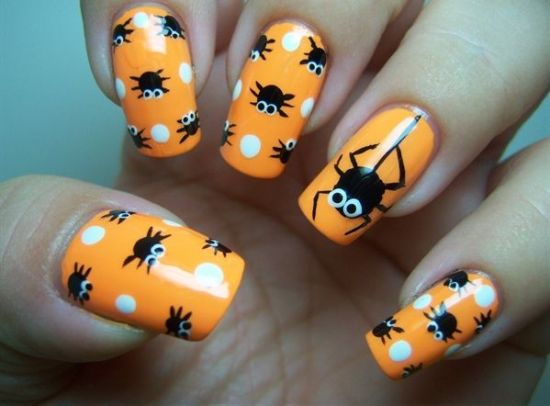
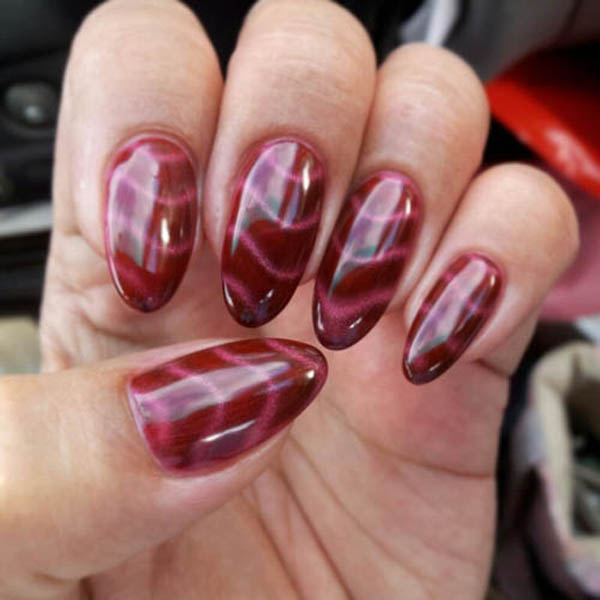
8. Crowstoes Voodoo Nail Paint Design:
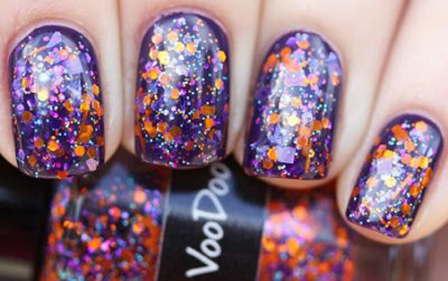
This is a fantastic nail polish if you can get your hands on this one then this manicure is just a swipe away. The top coat is essential for this one because you do not want the glitter flying around everywhere. Also, the topcoat colour needs to be transparent to look flawless. However, this is also one of the nail art for kids that you can come across.
- Take dark colour nail paint for the background. You can take nail paint to establish brands for better effects.
- Take contrast bright colours like yellow, orange, pink and gold and keep random dots on the paint.
- You can apply the transparent topcoat on the top.
9. Awesome Stamping Nail Art for Beginners:
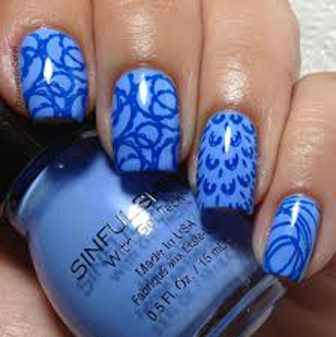
You don’t always have to be necessarily creative while creating nail art. This nail art is an example of that. Use your special blue stamping polish and light blue base paint. This has only one colour and still manages to impress. Speaks volumes about how even the simplest things can work wonders.
- This style requires two blue nail polishes of different tones.
- Take light blue and dark blue ones and do as seen in the picture.
- Each nail can have different patterns for the look.
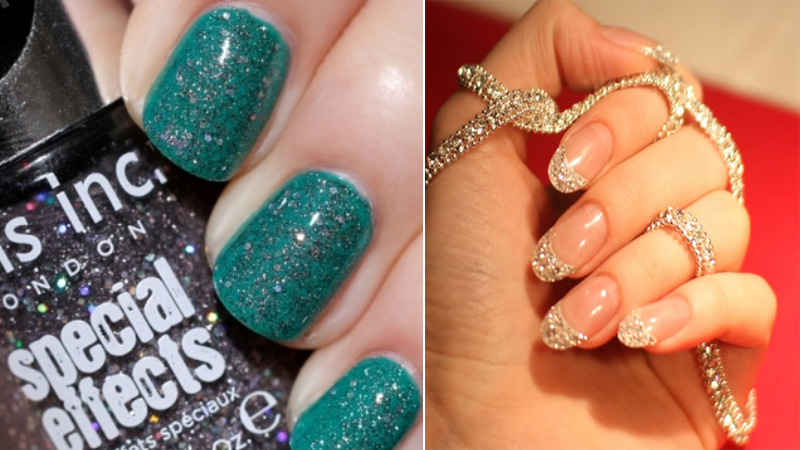
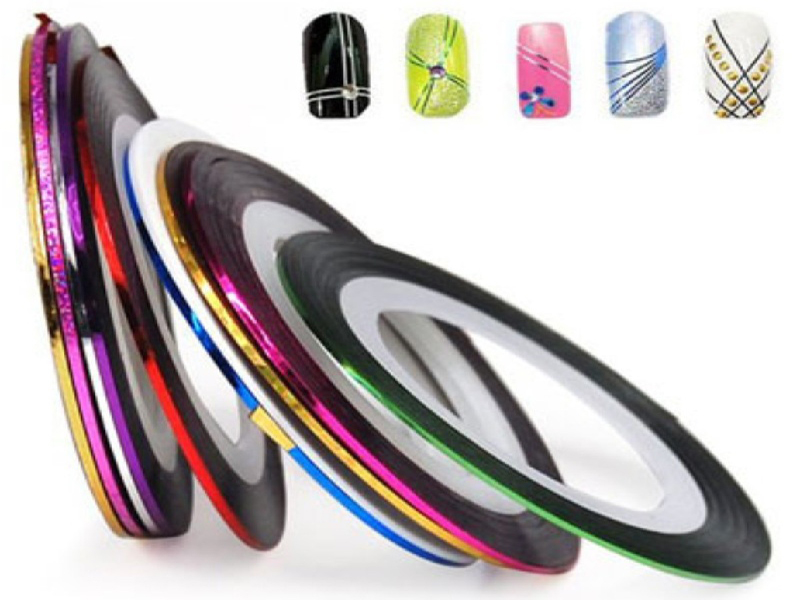
10. Easy Striping Tape Nail Art Ideas:
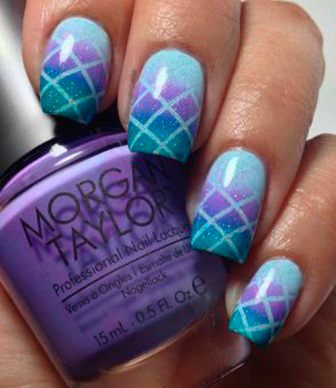
This glitter nail art can be quickly done with the sponging technique and striping tape. The striping nail arts are easily available with online shopping doing the rounds, and it should be as easy as a day for you to get hold of one. Try it!
- Take turquoise blue, purple and green colour paints.
- Take striping tape too for handy and easy application.
- First, apply a background of turquoise blue.
- Then take striping tape after it is dried up and do the given colours to make a pattern.
- Remove the tape once done.
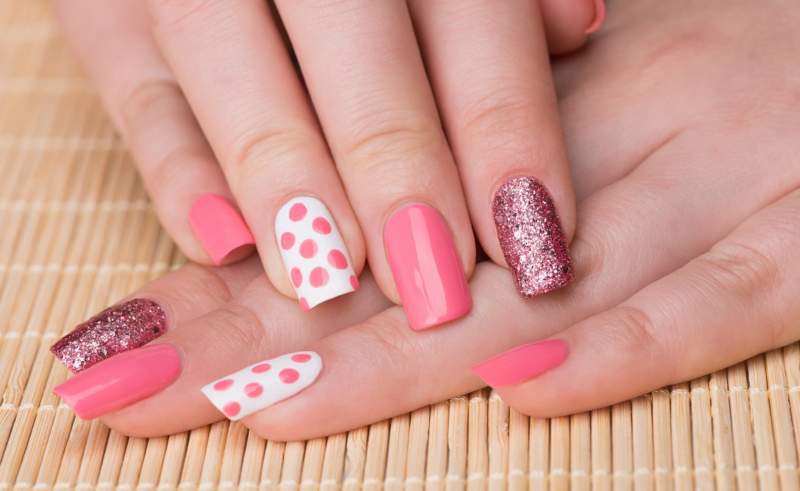
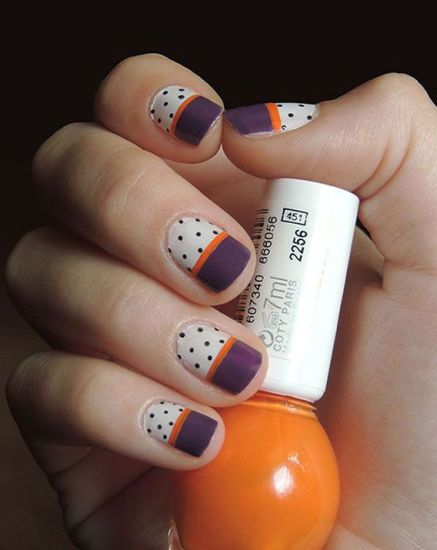
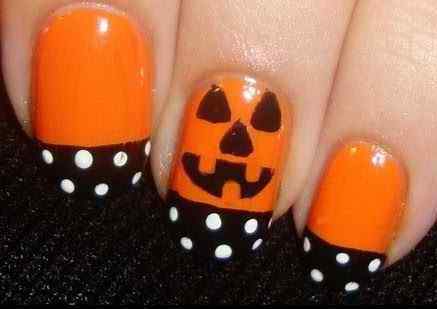
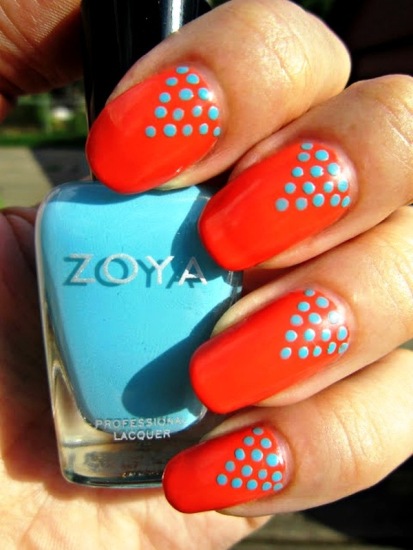
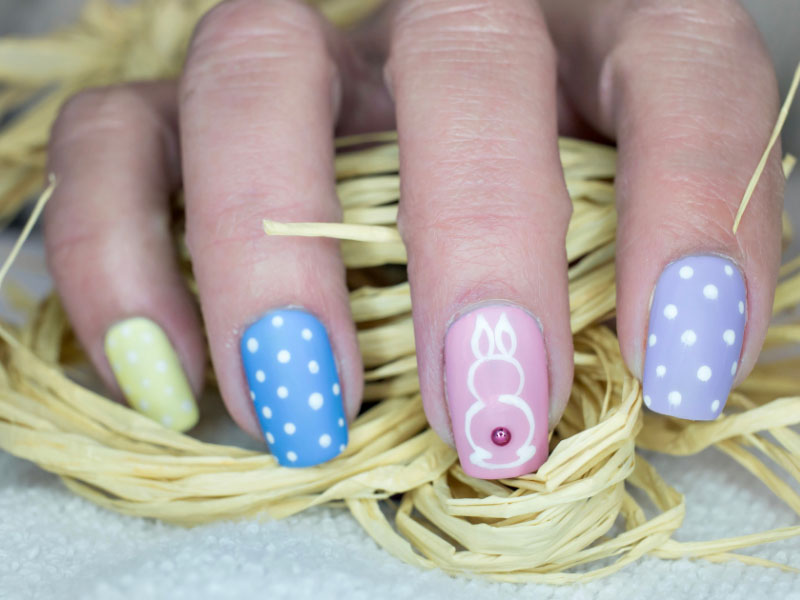
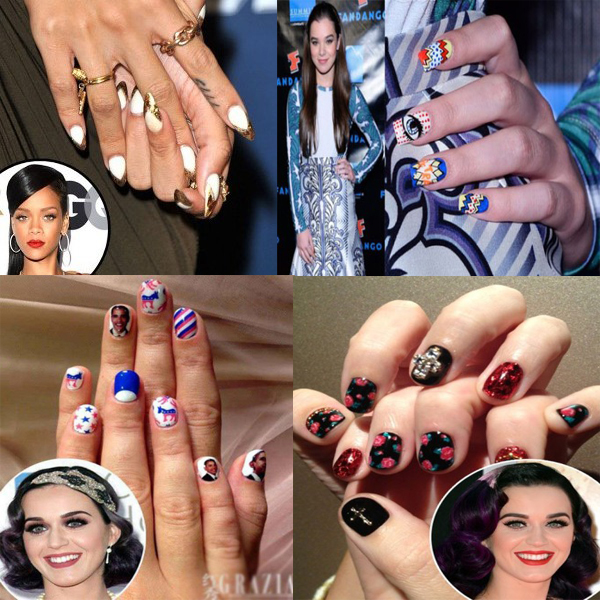
11. Easy Puzzle Nail Art Designs:
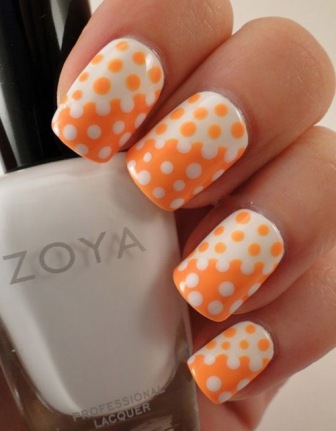
Orange and white polka dots give off a very pleasing feel and a retro touch as in French nail art to the nails. You can sport this look at theme parties and garner quick praises. This is super trendy-looking nail art and yet very easy to do with your dotting tools. And this suits long nails with established nail polish brands like Zoya and L’Oreal for better colour brightness.
- Take orange and white colour nail paints.
- First, make a diagonal and fill in both colours in the nails.
- Then take the opposite colours and apply dots.
- Once done, apply the topcoat too.
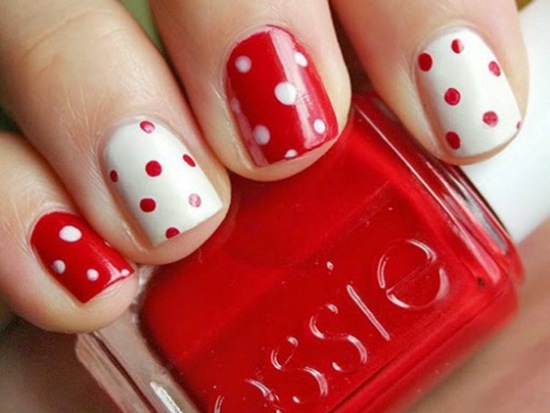
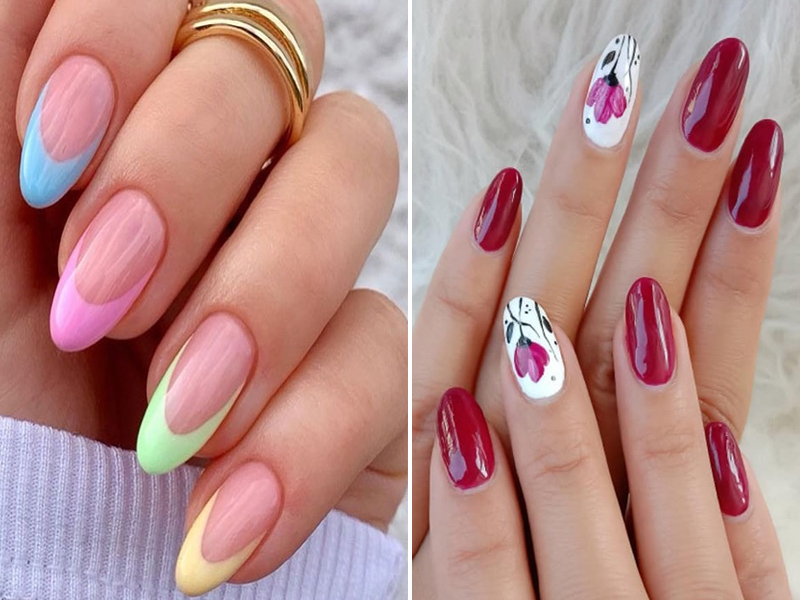
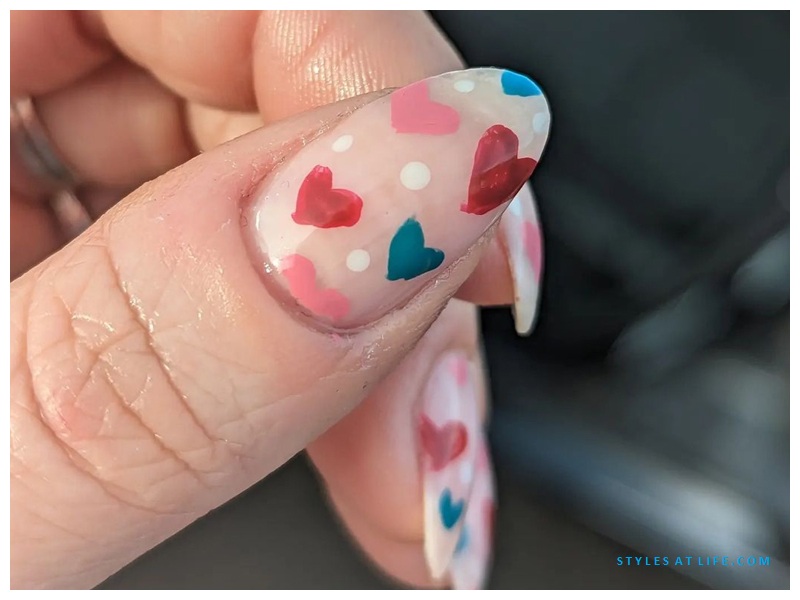
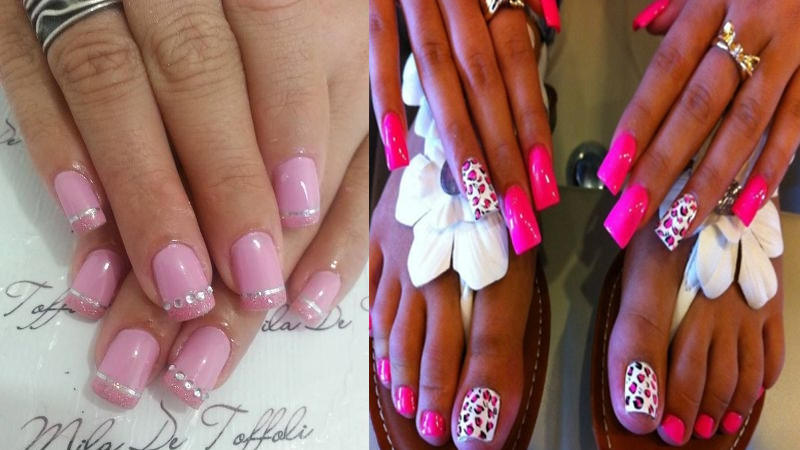
12. Easy French Tip Nail Designs:
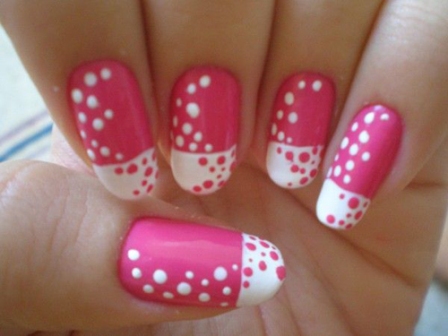
A lovely-looking nail art created with nail polish of two colours and dotting tools. The two colours overlap with pink and white looking for an attractive appearance. You can wear this nail colour at random events that don’t need too many dress-up details. This art can also be done with nail art stickers.
- Take dark pink and white nail polish.
- Apply half of the nail with one colour and another half with other colours.
- Give dots with other opposite colours on both sides, and apply a top coat too.
Read More: French Tip Nail Designs
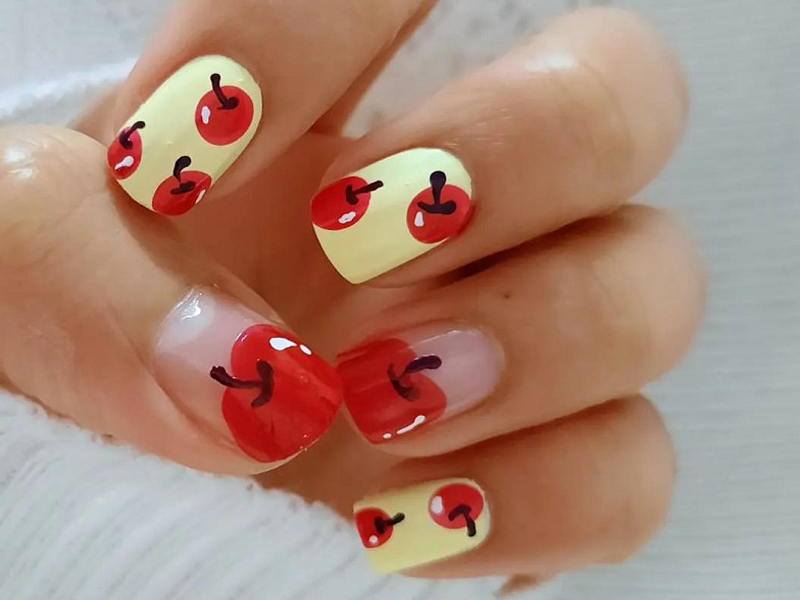
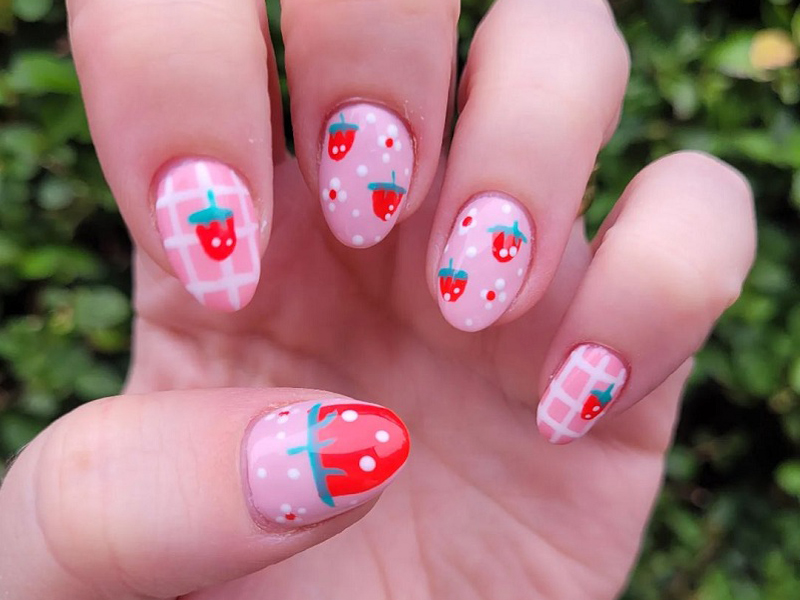
13. Cherry Fruit Nail Paint Design with Polka Dots:
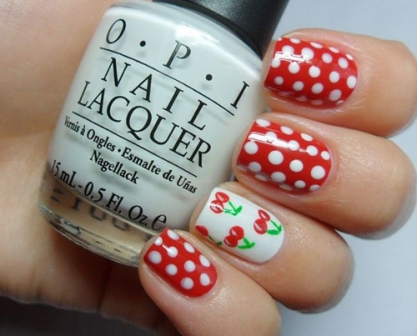
Would you try this nail paint art design out? You need to have either water decals for those little cherries, or you can also use a freehand painting or some dotting tools. When it mostly comes down to the white and red polka dots, that one finger with the plums is just what makes the deal away in the end.
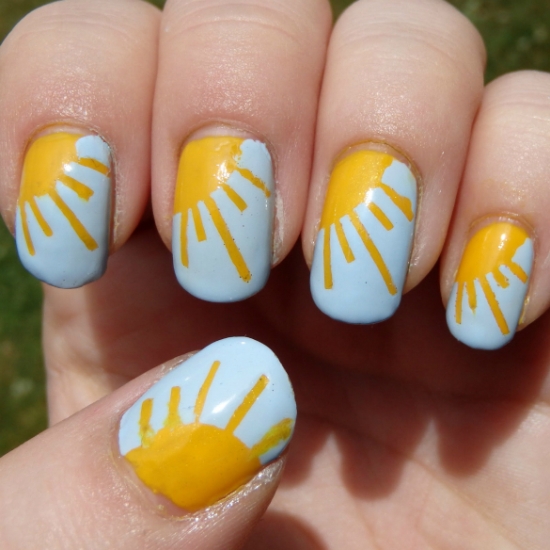
- This requires red, white and green colours.
- Apply as shown in the picture red and white paint with polka dots on four likes except for the ring finger.
- There apply a white background first on the ring finger and draw the plums design.
- You can also use a nail art sticker background for the design if you manage to find one.
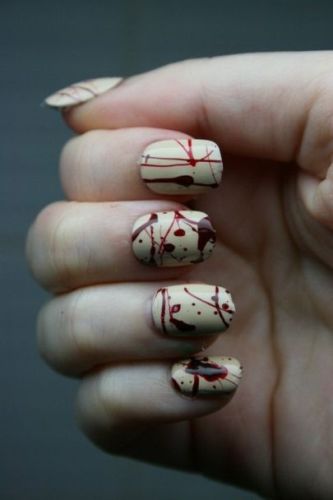
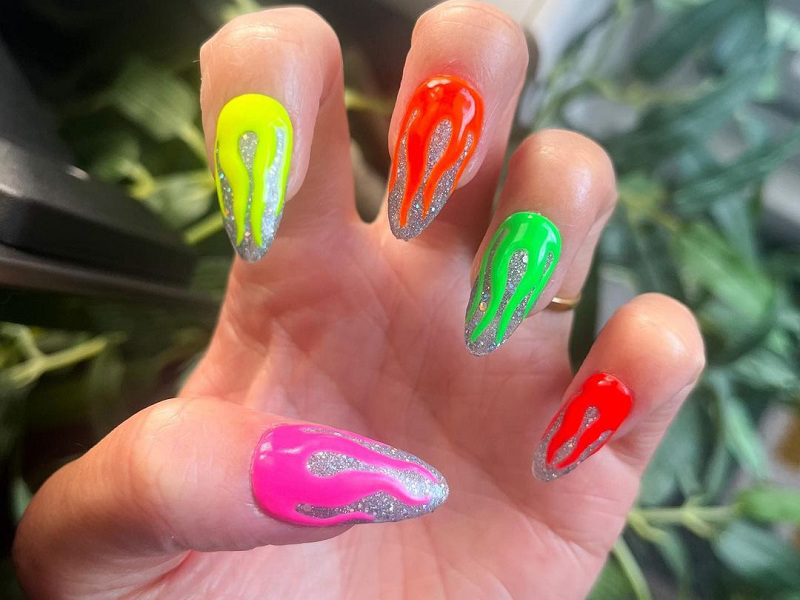
14. Easy Splatter Finger Nail Designs:
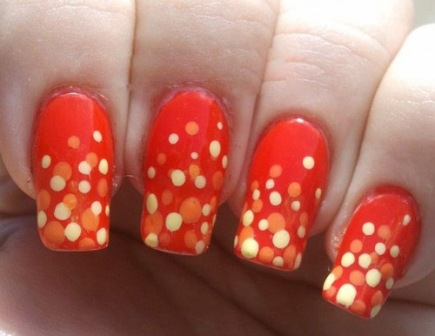
The best way to look gorgeous with this nail polish art is to make sure your nails are long enough, else it looks very crowded, which isn’t quite a good thing you should know. You can create a burning flame-type nail art by using your dotting tools. Try this design out. This requires nail paints of these given bright colours in brands like L’Oreal or Lakme for the design.
- Apply blood-red nail paint first.
- Take orange and white colours and make dots on the top of the nails randomly.
- This is easy to do and does not require effort too. Apply top coat.
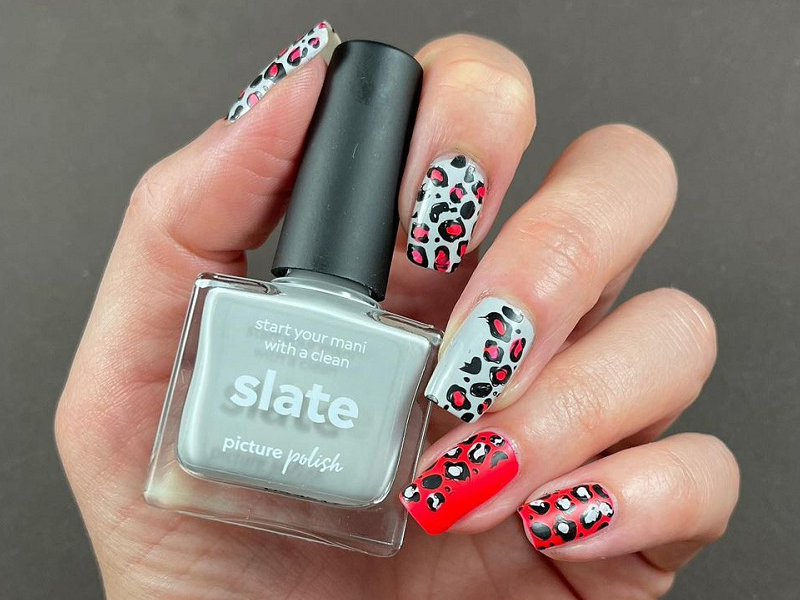
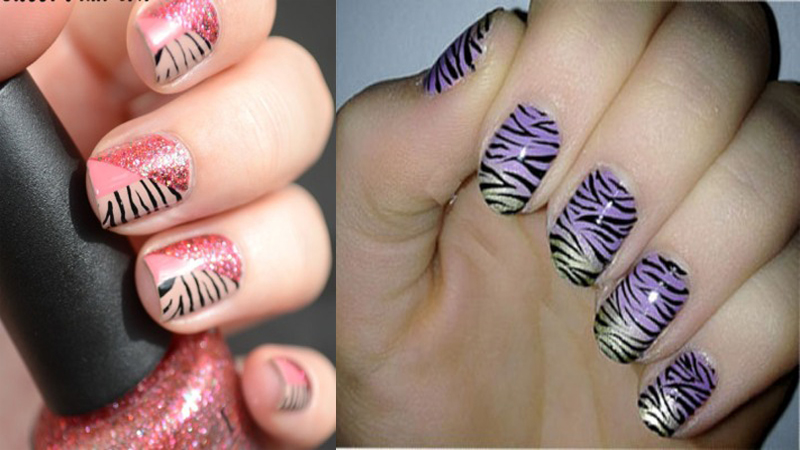
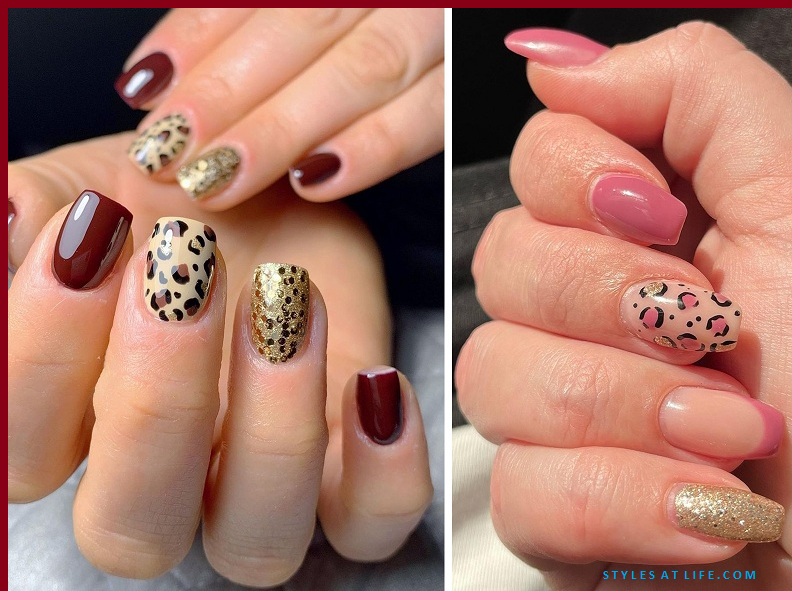
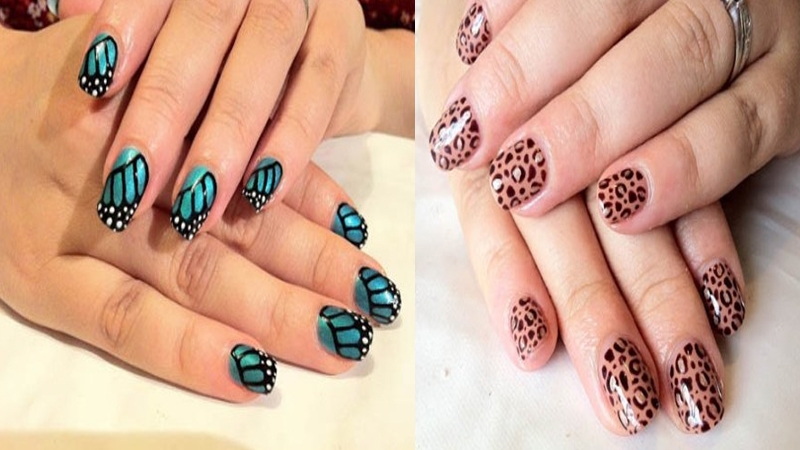
15. Colorful Leopard Nails Art:
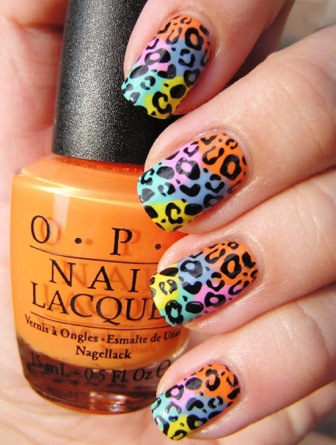
You can give this design a try by using different colours of nail polishes. Use your dotting tools to create those leopard prints. Keep a sponge around to give this design a finishing touch worth the time you spend putting all of it up and bringing them together. This can also be used as Christmas nail art.
- Take earth colours like yellow, pink, green and blue along with the main black colour.
- Apply background paints first with these bright colours in a particular shape as you wish.
- Then apply leopard-shaped prints with black. Apply top coat.
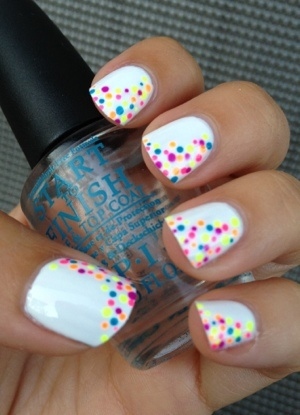
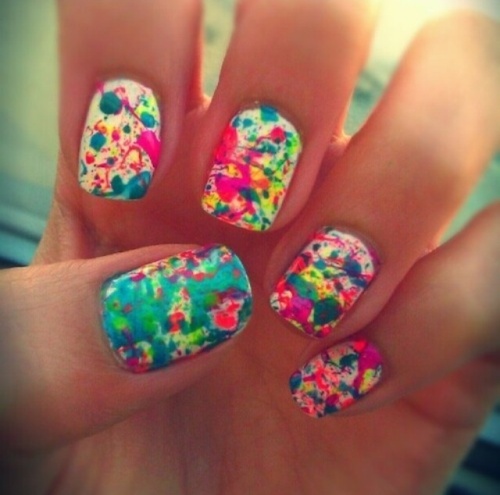
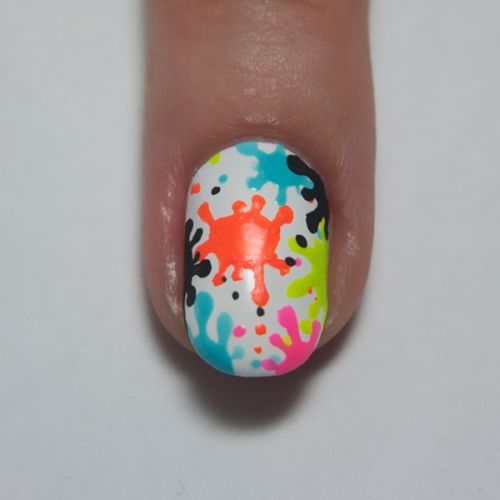
16. Beautiful Multi-Coloured Candy Splatter Nail Design:
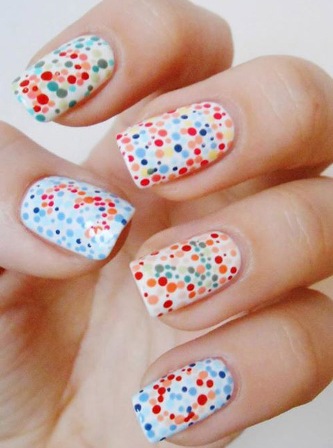
This one looks like mini DNA results that doctors usually have around their homes experimenting with. In any case, it manages to impress equally well all the same. Try out tiny dots of different colours to create a splatter nail like the one above. You can do this as gel nail art too.
- Apply a white background first.
- Take all the favourite bright colours you like and add a polka dot design.
- This is the easiest nail art design to do.
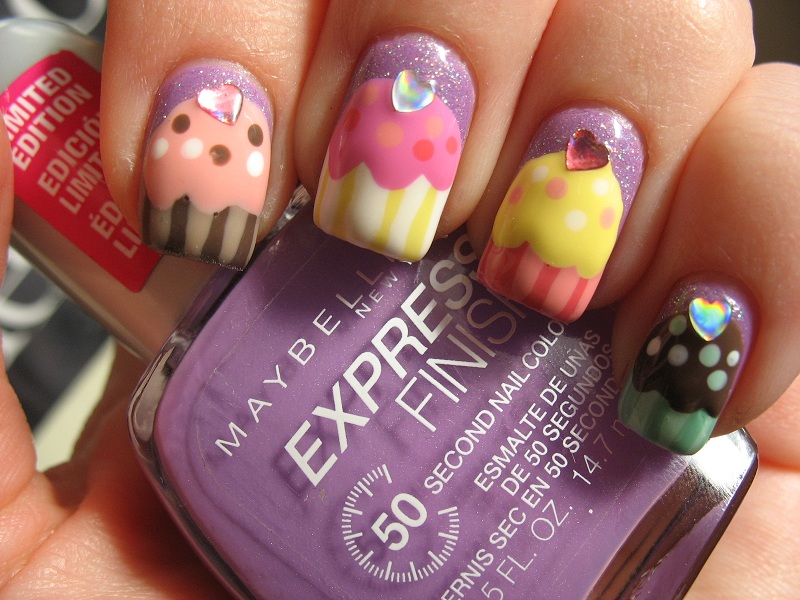
17. Cute Cup Cake Nail Designs:
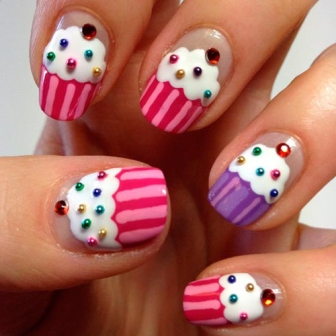
Use your nail art brush along with some caviar beads and rhinestones to create cupcake nails. These are very easy to create. You will need your dotting tool or a toothpick for the cake curvature. For Christmas this time, you know just what to do to impress your family and friends and be the centre of attention the whole time. Apply this as Christmas nail art.
- Take good, branded thick nail polish for this art.
- Take grey, white, blue and red shades.
- Apply grey in the background and then white colour in the form of a cupcake base with curves.
- Then add pink and blue shades, as shown in the picture on the top part of the nail. Keep stones for the look.
Read More: Cupcake Nail Art Designs
18. Easy Vertical Dots Nail Art for Beginners:
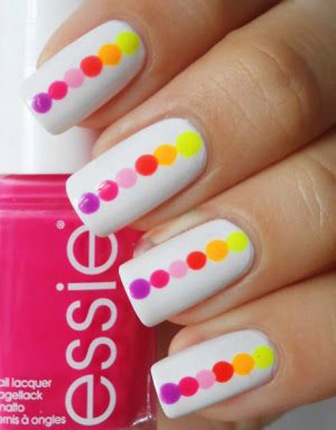
The only thing you need to have around is a brush to get the dots perfectly and different shades of nail colours that blend well with the initial white colour. You can easily create this type of nail art even as 3d nail art, but you need the three shades by using the dots of different colours in line with your dotting tools.
- Apply white background at first.
- Then add bright colour dots in vertical line form.
- This is easy to do and looks elegant and straightforward too.
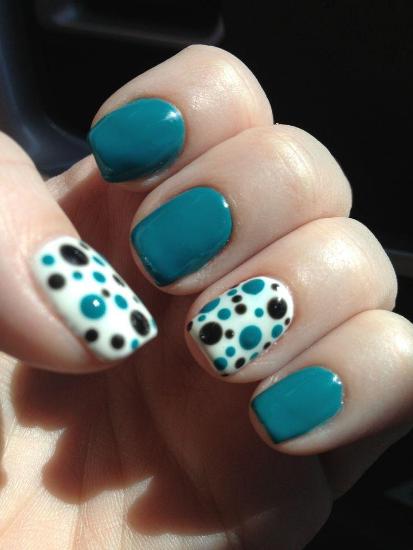
19. Easy Polka Stylish Nail Art Design:
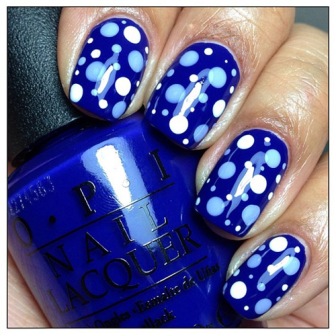
This look is more of an aquatic one and very creative at that. It features the two favourite shades of blue for most. And this is another easy polka design that you can try out using just your dotting tools, and it looks awesome. This may need OPI or other branded nail polish for the texture.
- Take blue polish and apply it as a background.
- Now take sky blue and white colours and apply polka dots. Apply top coat too.
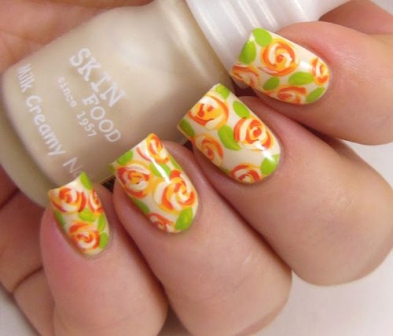
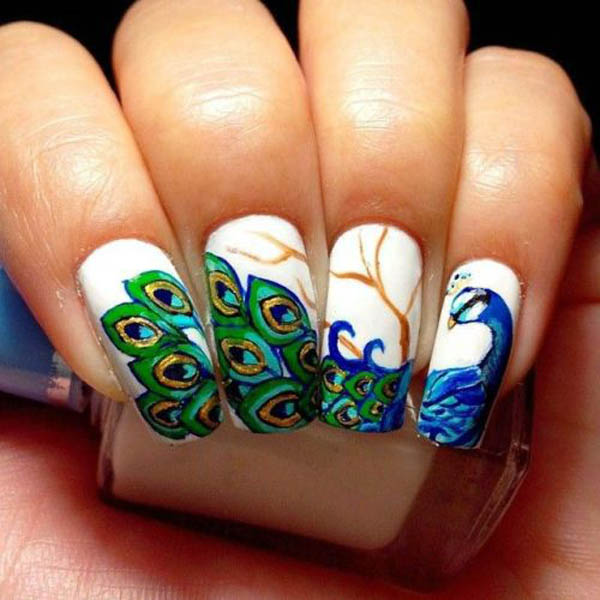
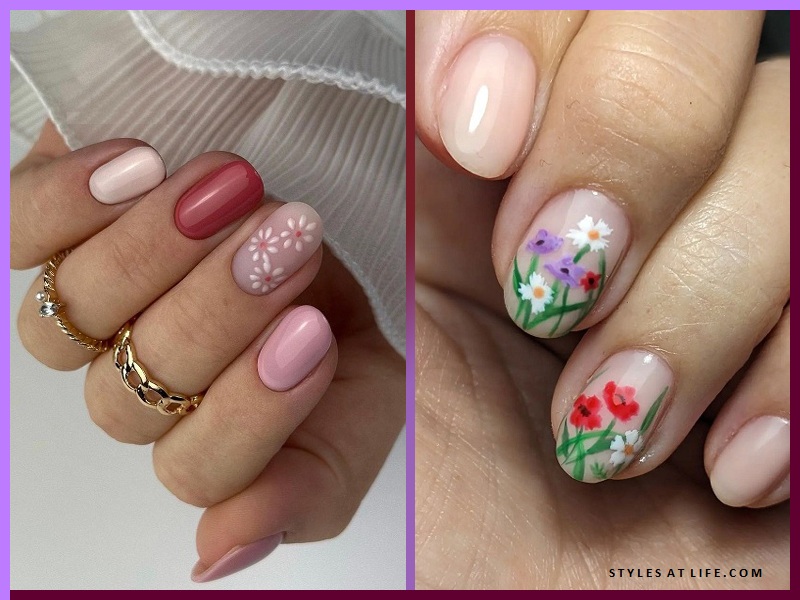
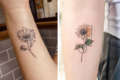
20. FreeHand Flower Nail Design Ideas:
This might although, and we admit be a little hard to draw and create all by yourself, so it’s best that you find an apt nail parlour and let their professionals work on your fingernails like a charm. If you have good hands at drawing on nails, then you can try out this design using acrylic paints and a nail art brush.
- This may require nail art stickers to help to make that perfect shape.
- In case you are creative, you can try this out by applying white colour in the background and then applying orange and green shades to make a flower.
Read More: Floral Nail Art Designs
21. Blue Ombre Nail Art:
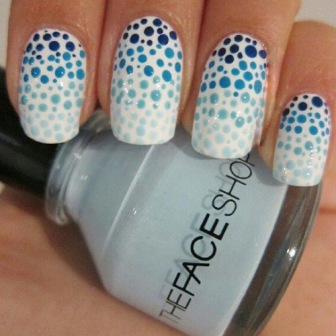
This is an easy version of Ombre nails using dotting tools and colours in different densities of shades of blue. The Face Shop is one of the best cosmetic companies doing the rounds, so you can be sure that the beautiful look that you get from this nail colour will stay around for quite a while.
- Apply white background at first.
- Take bluish shades in varieties and make random dots on nails.
- Apply a top coat for the finish.
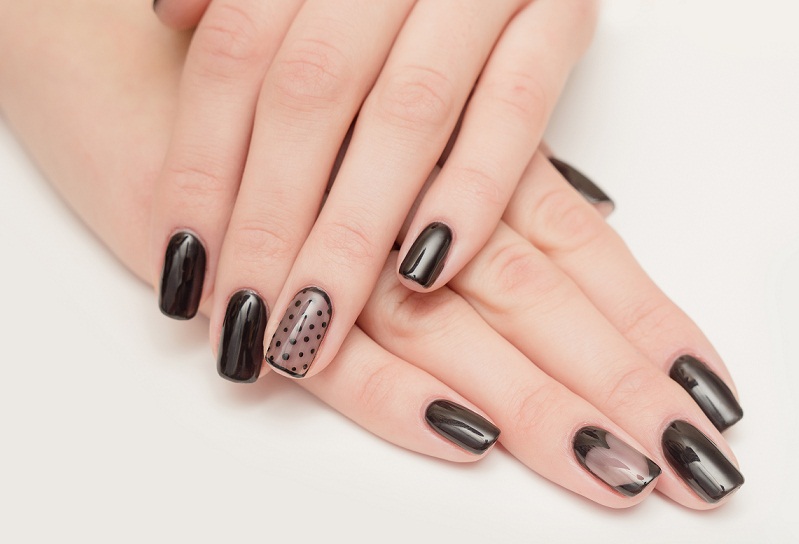
22. Different Stamping Nail Art Designs:
This nail colour essentially has two colours cream and white. But, you can choose a different base as well, as long as you change the tone of the highlight colours. This is easy to do Halloween nail art using different nail decals and stamping. Some freehand painting is also involved. Use some sequins of square shapes for additional decoration. However, if you cannot get stamping plates of the required designs, you will have to go fully freehand for this one. This is also done with water nail art.
- Take a white and beige colour background nail polishes and apply them as shown.
- Then take blue, and pink and make the patterns as you like randomly as an art form or as shown in the picture.
- Use creativity and decorate with stones.
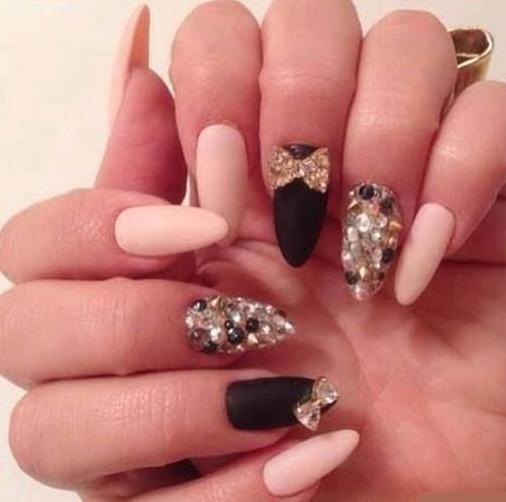
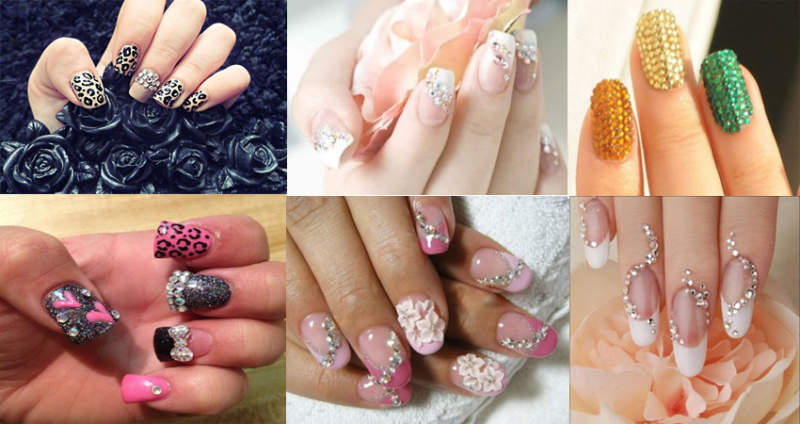
23. Best Bridal Nail Arts:
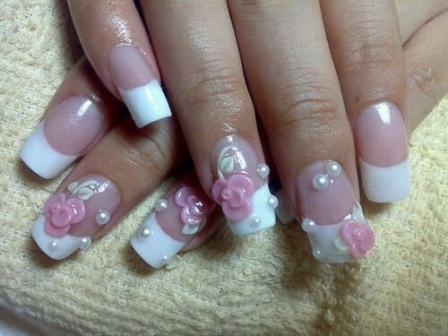
The nails are well-shaped and manicured, so that’s a big plus point to brag about in the end if you ask us. This is an example of bridesmaid or bridal nails in French tip style. And this is flower nail art. Acrylic flowers have been created, and some pearls have been used using transparent polish.
- This requires professional help in case you are not experienced to create flowers.
- Use pink and white as the background first.
- Use acrylic polish to create flowers and keep white paint as pearls. Leave it to dry.
Read More: Indian Wedding Nail Art
24. Stencil Star Fashion Nail Design:
Stencils are not yet available in India, but if you can create some stencils with scotch tape and scissors, then they will be suitable for nail art. You can skip the stencil on all fingers if it gets too hectic as well, and still manage to flaunt your style uniquely. You can reuse stencils too. This design has been created using the sponging technique and stencil star design.
- This requires bright red and blue nail polishes.
- Paint in this given way both the nail paints with red polish on the top side of the nail.
- Keep stones of any shape of your choice for the look.
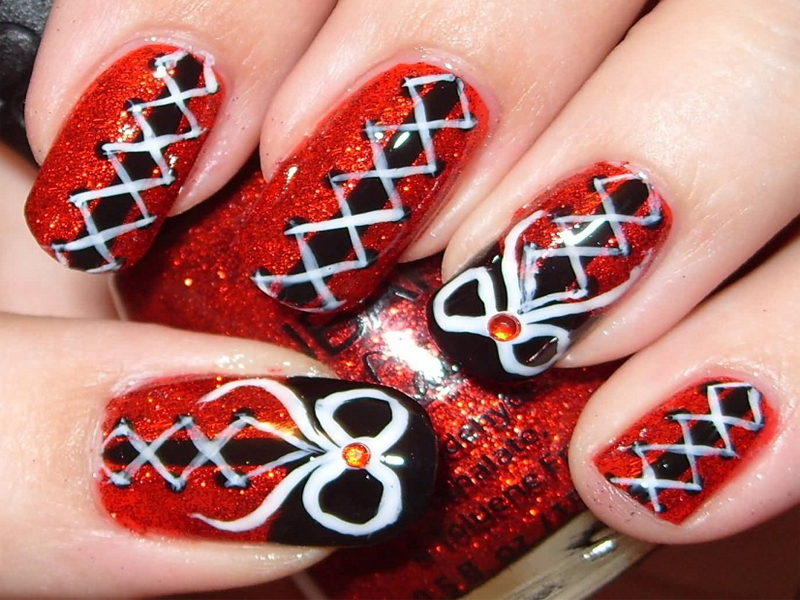
25. Tribal Nail Art Designs for Girls:
The Aztec thing going on alongside is such a bonus as well. You can try out tribal nails by freehand painting. This is colourful and requires creative sense to do these kinds of patterns. In order to let these colours stay for longer, go with good nail polish with texture.
- Take bright colours of choice and think of good patterns.
- Apply this polish to patterns and crisscross designs. Add a topcoat at the end.
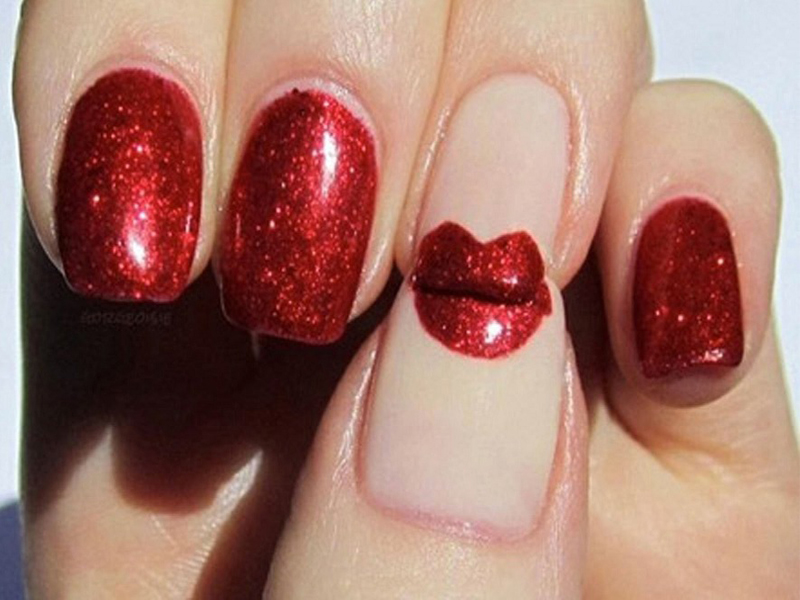
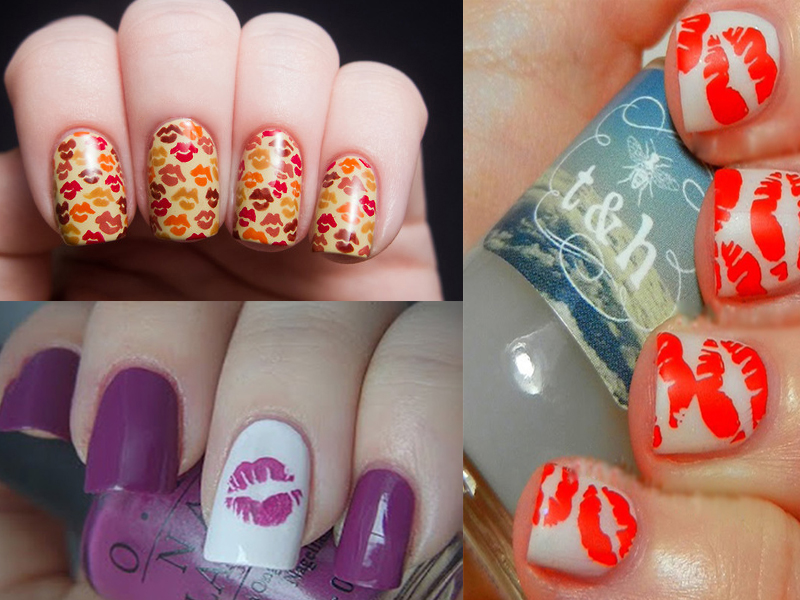
26. Newspaper Nail Art with Kiss:

This is evergreen nail polish for those who love creativity. And this can also be used as wedding nail art for those who are creative freaks. Try using good texture nail polishes from brands like Essence, Maybelline or Lakme for the texture.
- Use acetone for getting the newspaper print out on nails over a base coat.
- Additionally, use some kiss decals or a stamping kit for the kiss design.
27. Nail Designs Vintage Polka Dots:
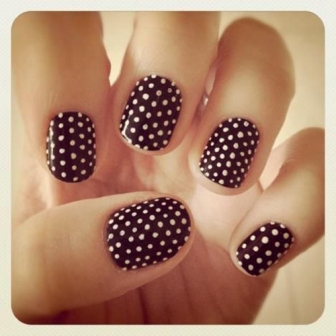
You can team the lookup with a white or a black dress to steal the show in the classiest way possible. This will remind you of 80s polka-design dresses. Try this out with good bright colours like dark red or brown.
- Use the bright background colour first.
- Add polka dots with white paint for the design.
- This is an easy yet classy one.
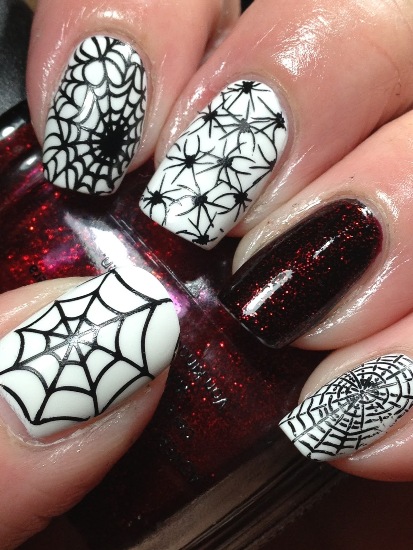
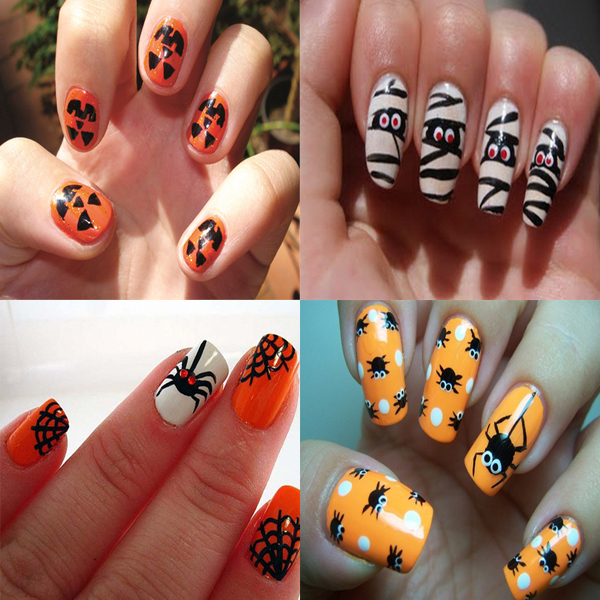
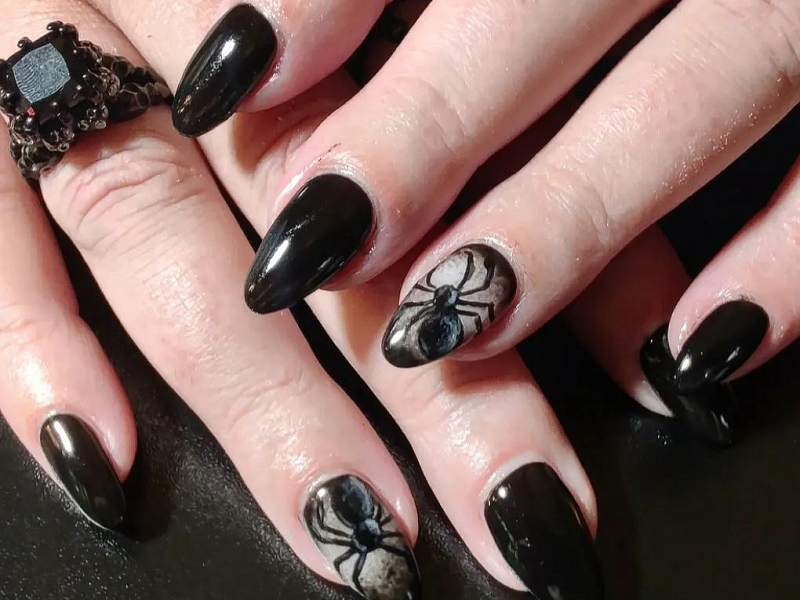
28. Web and Spiders Nail Art Designs:
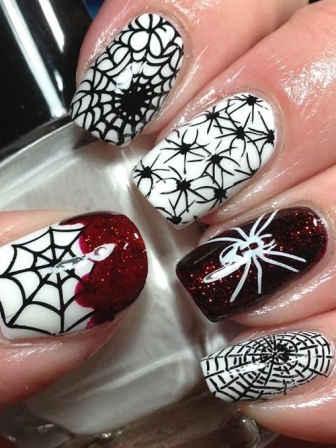
All the fingers feature a different style with this one, and you can rock this look for a long time with a lasting top coat to keep the colours in place. Use shiny bright nail polishes with glitter for the look
- Create this design using stamping plates.
- Take these nail polishes and use plates to stamp the contrast colours of white/dark red as shown in the picture.
- Apply topcoat in the end.
Read More: Web Spiders Nail Designs
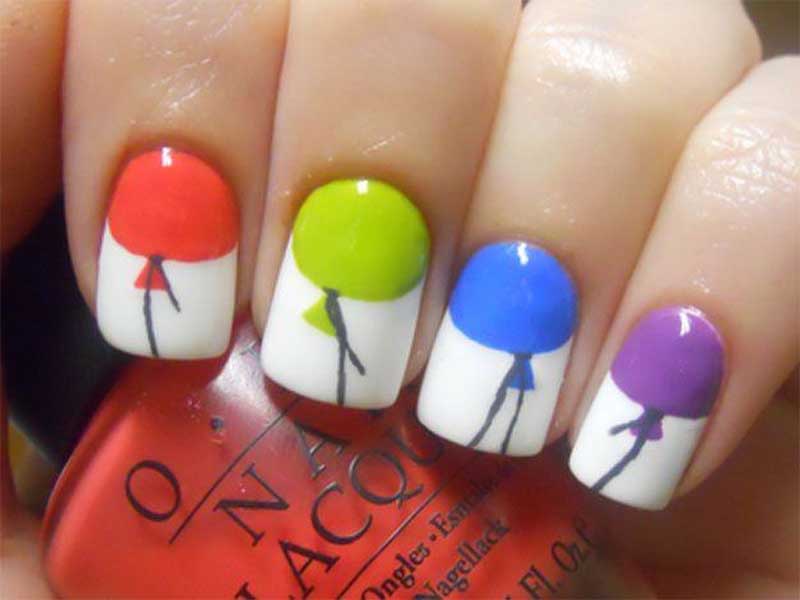
29. Awesome Nail Paint Bottles Design:
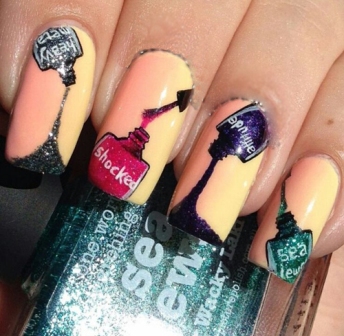
Another thing to be cautious about this nail colour is to keep in mind if you can actually rock in on your nail size. Grow them if you need to. It is a very creative and artistic nail art. Give it a try but make sure you can draw well on your nails.
- Apply bright yellow paint as the background.
- Use the creative sense and draw with contrasting bright colours similar to bottles of art.
- Use glitters and paint and draw, as shown above. Apply top coat after it dries.
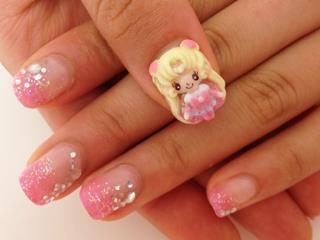
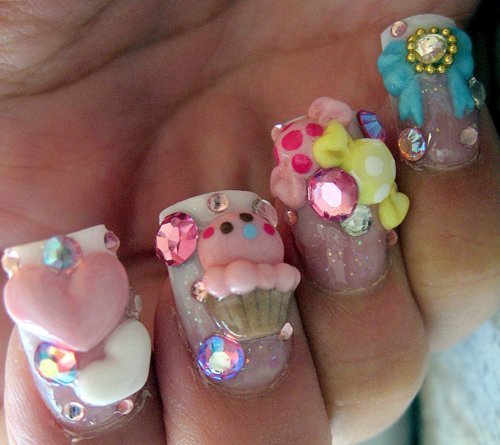
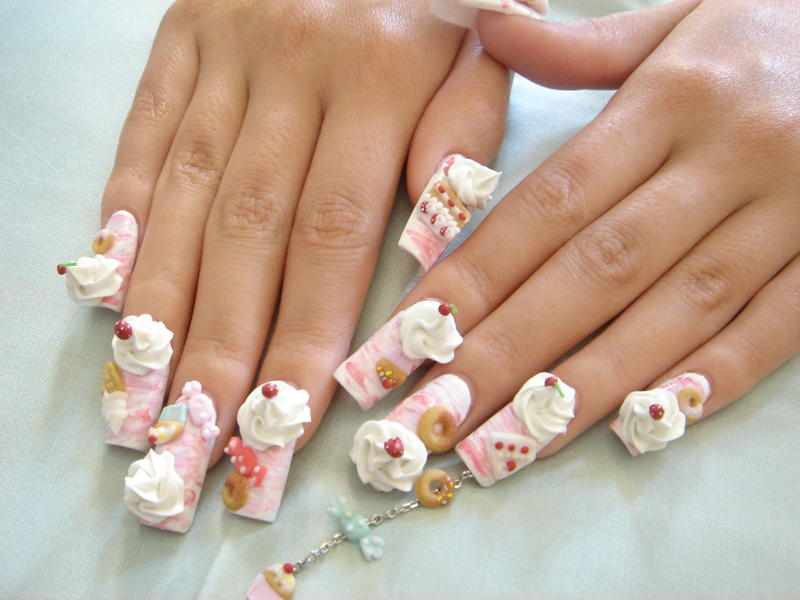
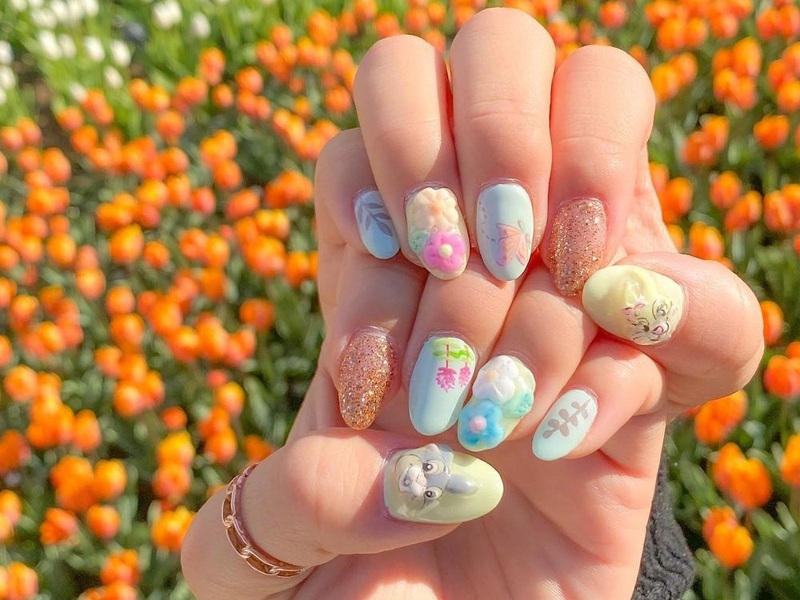
30. Kawaii Nail Art Paints:
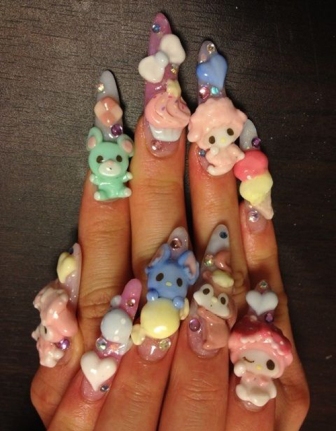
Kawaii means cute or adorable in Japanese. You can try out attractive nail designs and pink nail art like this one using suitable quality nail deco materials. This requires professional help for those who do not know how to use these materials.
- Get decorative nail materials.
- Once you draw the background, stick them on nails with glue.
Read More: Kawaii Nail Art Designs
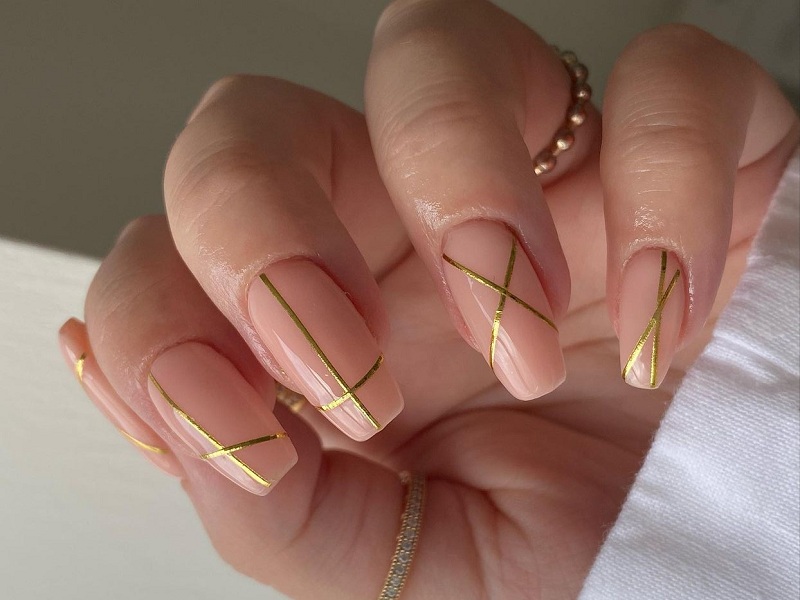
31. French Tip Designs Nails:
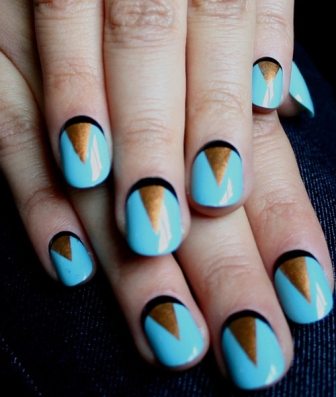
Try out a design like this for a change from those regular French tip designs. This is among nail art stone designs and is quite easy to do. All you need is two bright colours like gold and blue, which are in contrast along with some coats.
- Apply gold colour as a triangle shape at the bottom of the nail.
- And apply a blue colour on the remaining part. Apply a top coat once dried up.
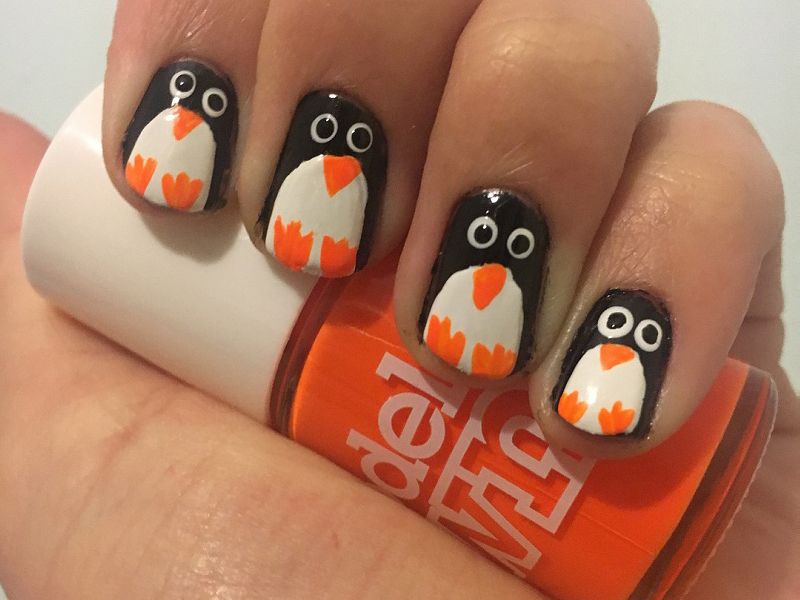
32. Cute Panda Nail Art Designs:

Almost everyone loves this. It’s very easy to create panda nails using dotting tools. If you are just as lazy as the animal, or at least people think that you are, prove them wrong by undertaking the tedious job of putting this nail art to life overcoming all the hassles that come along along the way.
- All you need is clean nails in white and black colour.
- Apply white colour at the top end of the nail.
- Take black polish and apply dots in a given shape to make it look like a panda.
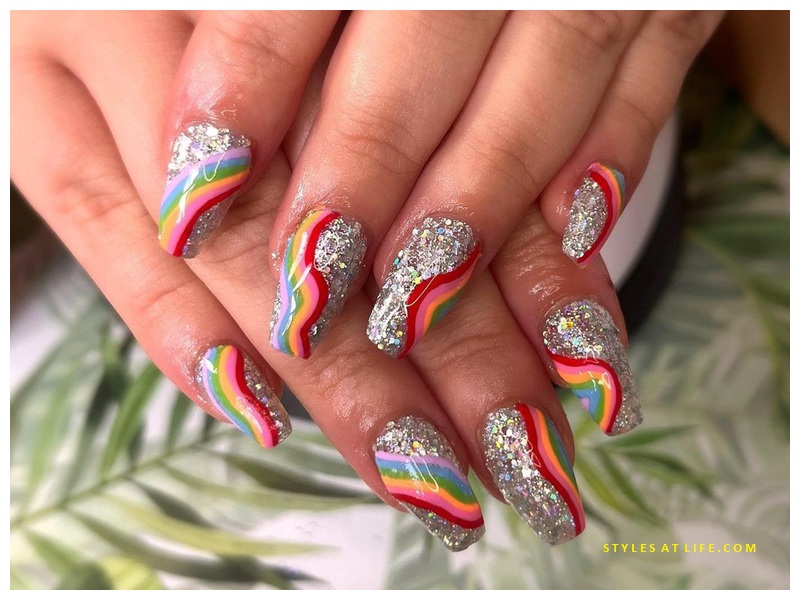
33. Rainbow Design Nail Art:
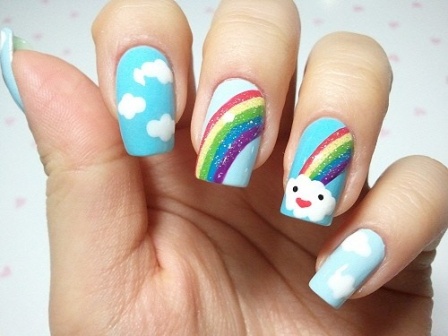
A rainbow nail art design cannot go unnoticed. Use dotting tools for the face and clouds. Use glitter strippers for the rainbows. This can also be done as acrylic nail art. All you need is blue and white paint with rainbow colours from any brand.
- Apply the blue background to all nails first.
- For the nails you wish, do a cloud design with white colour.
- For the other two nails, apply rainbow colours drawing with lines to look like a rainbow.
- Use glitter colours for the rainbow shades for the look.
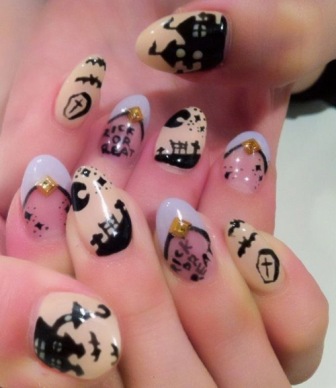
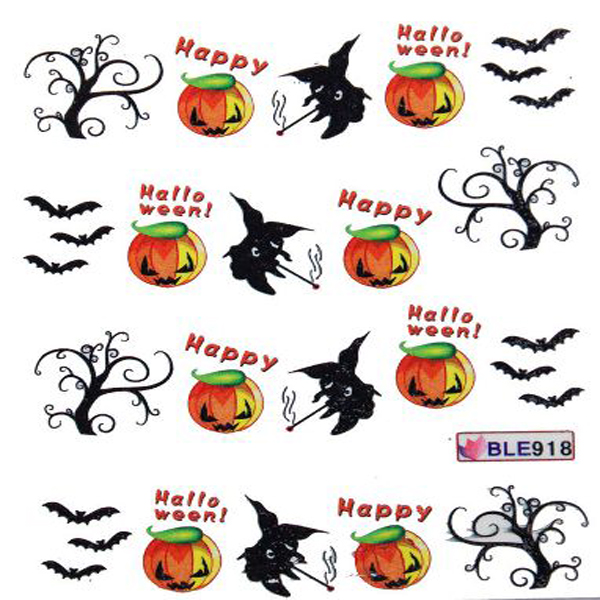
34. FreeHand Halloween Nail Arts:
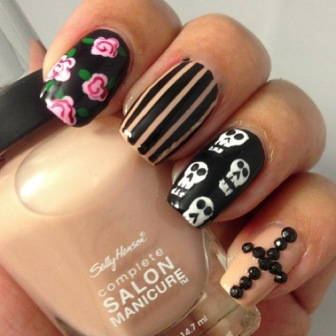
Try out these freehand Halloween nails using dotting tools and a nail art brush. This in case you need can also be applied with stamping nail art. It is not difficult to do, and all you require is black, gold, white and pink colour shades.
- Apply black background to the first four nails and pink background to the little fingernail.
- Do as shown in the paints in the picture for patterns and designs.
- Use some black Rhinestones for the cross.
35. Vintage Red Rose’s Free Hand Design:
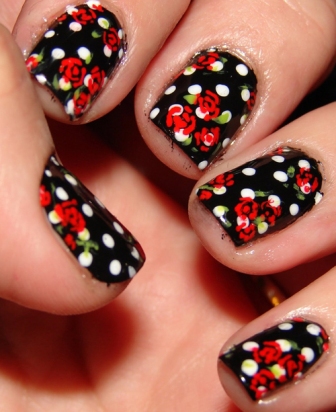
If you love flowers in the end, this style will lead you to appeal for a show no matter what outfit you pick. It is equally suitable for short nails and long ones. Try this DIY nail art design using a simple toothpick and the required colours.
- Apply black paint as a background at first.
- Later use white polka dots all over.
- Take red paint and a toothpick and smudge the bit of red colour in the nail as shown in the picture.
- Use a topcoat at the end.
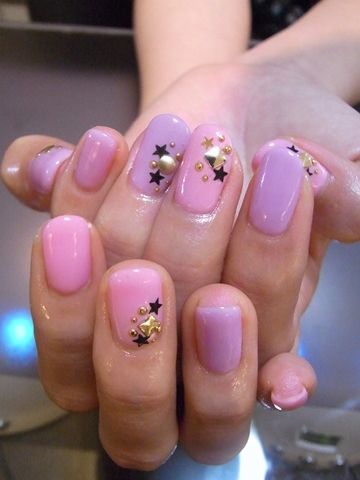
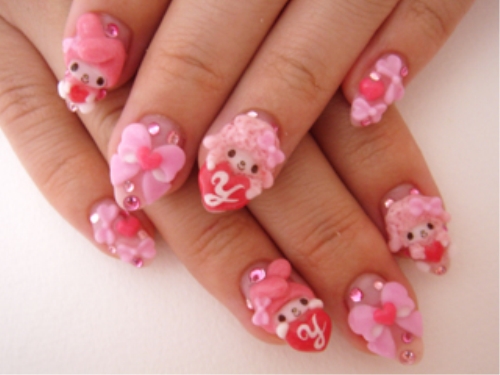
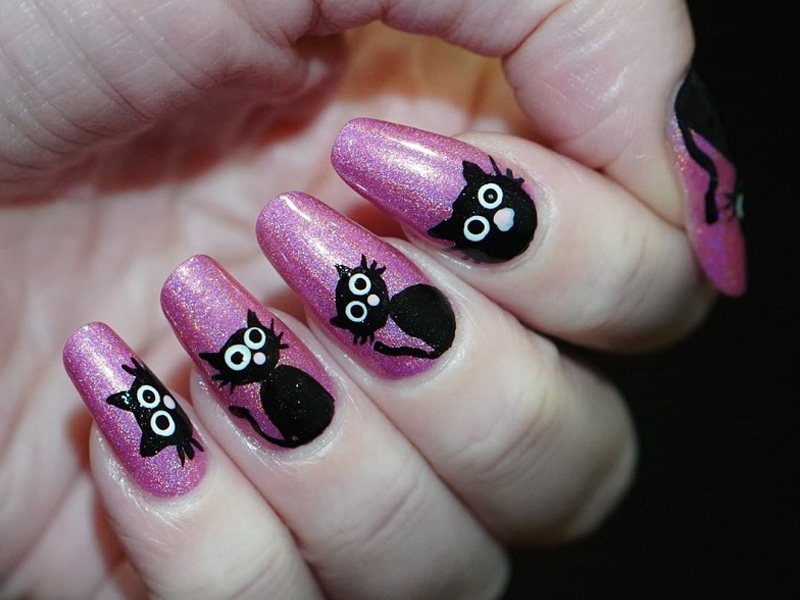
36. Pink Kawaii Nail Art Designs:
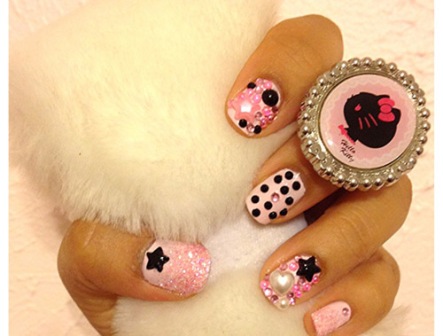
Try out a Bling cute nail art like this one quickly with lots of Decos in stars and heart shapes and some rhinestones. Use some glitters too. This is girly and gives a good appeal to those who want to try out something new. And this needs some pink and black nail art designs.
- Apply a pink coat with glitter all over the nails first.
- Then use black colour rhinestones to do that design.
- Use white rhinestones too in between.
37. A Different Type of Tribal Nail Art Styles:
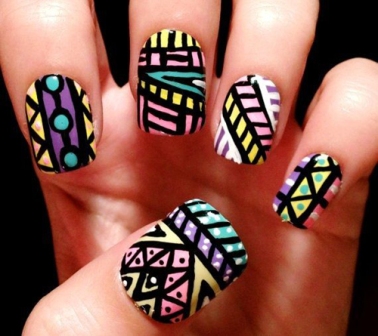
Tribal nails are easy to create with slow and steady hands. You will require your black striper and a few different coloured nail polishes. You will also need some toothpicks. Use the blunt end of a toothpick to pick a certain colour and do not use that toothpick for another colour; otherwise, colours will get mixed up. Try this one out!
- This requires bright colour nail polishes.
- Draw the patterns, as shown in the picture and use black as a striper.
- Hence it is first wise to draw the main colour as a layer and use black to draw patterns at the end. Apply top coat after the finish.
38. Cute Dotted Nail Designs with Teddy Bear:

Only one finger features the teddy, so you need to make sure you get the look right to finish the deal like a pro. Try out a cute teddy design like this using your dotting tools.
- Take orange and beige colours for this design with some black polish too.
- For alternative fingers apply these colours to the nails.
- Use polka dots with other colours than those used in the background.
- For the ring finger, you can try something new by applying and making a panda face with orange and black paint.
39. Leopard and Zebra Print Nail Art Designs:
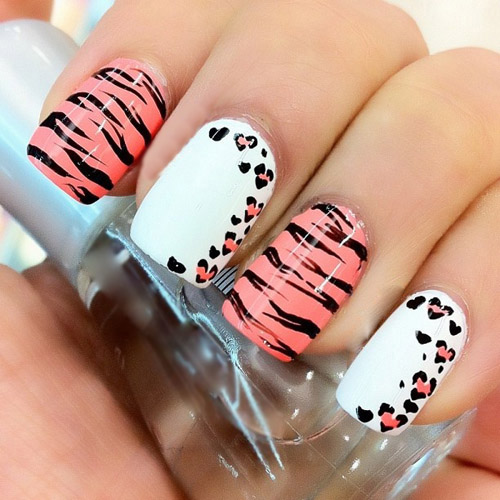
The nail colours alternate, so once you get hold of the design, the second time’s easier to manage. This brings down the overall time for the model significantly. And this is a lovely artistic concept involving both the prints of the animals in a cute pattern. Try out this white nail art with bright colours.
- Apply orange and white colours to alternative nails.
- Use black with orange to draw tree branches creatively.
- For white, use black polish and orangish pink to draw in the sides as dots and polka designs.
40. Hugs & Kisses (xoxo) Style Nail Arts:
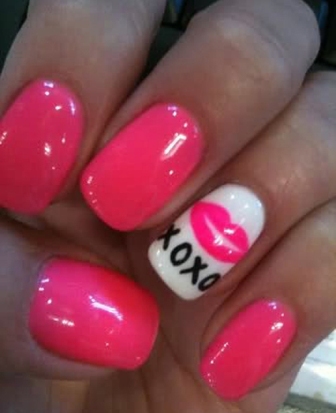
It’s very easy to create, and you will need your dotting tools for the lip pattern and the nail art black striper for the “XOXO” pattern. If you have always been quite a fan of the American TV show “Gossip Girl”, you will know that XOXO is everything you can wish for, finally, eh? This just requires pink and white colour polish.
- Apply pink polish on all nails.
- Apply white nail paint on the ring finger.
- With pink paint, draw as shown in the picture and write XOXO.
- This is easy and cool to do in no time and effort.
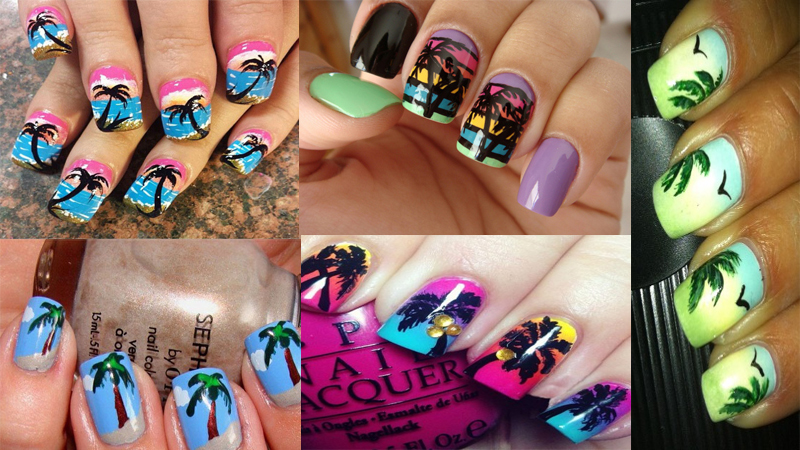
41. A Palm Tree Nails Art:
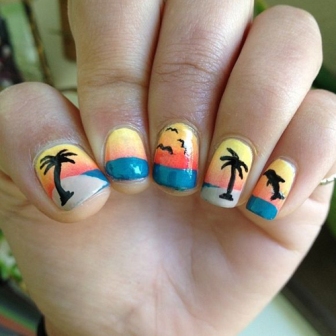
A palm tree nail art is classic nail art. It is very easy to draw. Use a striper in black for the palm trees and some sponging for the background in different colours. So if you are going to hop to a beach for the holidays then try sporting this nail art to go with your shorts and bright-coloured bikinis.
- This beach-ready paint requires bright yellow, blue, orange and black colours.
- As shown in the picture, apply blue and yellowish-orange colour shades in the ombre type on nails.
- Then use black paint to draw patterns of trees and birds.
- This is easy and looks creative too. Apply top coat after drying.
Read More: Palm Tree Nail Art Designs
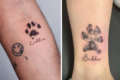
42. Cute Cat Paw Print Nail Art Design:
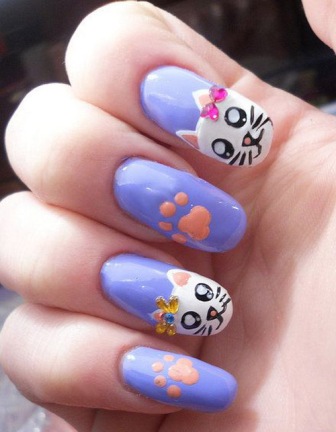
For all those who love cats, this nail art is for them to try out. This is easy nail art at home and easy nail art for kids. All you require is white, blue, and purple colours.
- Apply purple all over nails and use white at the corners of alternative nails to draw a cat.
- Do the paws using dotting tools and also the striper for the cat face.
- Additionally, use some deco bows or rhinestones for the bows at the cat’s ears.
43. BlackBoard Nail Art Designs:
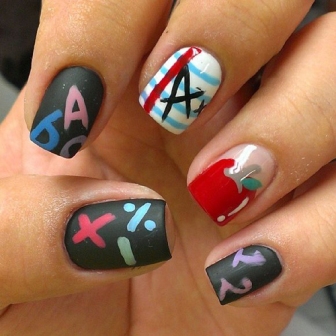
This is completely weird nail art and a bit abstract too. It has an apple, some numbers, some mathematical symbols and letters. Will you try this out? You may additionally use some transparent matte finish topcoat like in the picture to give a matte effect to the black polish. You can use a black matte polish itself also. This can be quite a nail art if you wish to sport back-to-school blackboard nail art.
- Use black matte nail polish first as a background for alternative nails and do white for another nail.
- Use other matte polishes and draw, as shown in pictures, the shapes and letters.
- For other fingers, take red and grey polish to draw for the ring finger quickly as shown here.
- The middle finger can be made by doing stripes with blue paint and using black to draw a letter for the look.
44. Dotted Cat Face Nailart Design in Yellow:
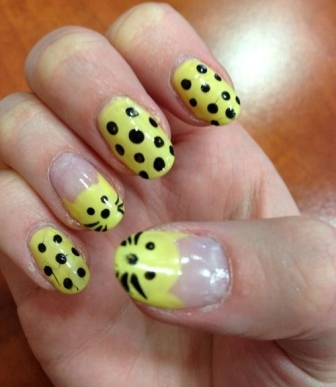
Cats are the favourite of many. Some of you must have some fluffy friends too. So why not try out a cute cat face design in yellow like this one? Use your dotting tools for this design.
- Make yellow background at first. And use black paint for dots.
- Use a black striper for the whiskers.
- Seal off your design so created with a transparent topcoat.
45. Despicable Me Nail Designs:
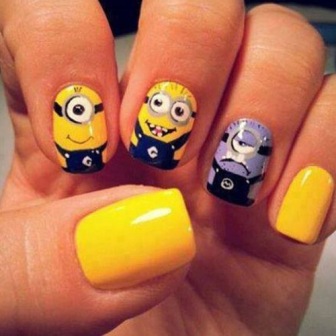
The show stopper is the purple evil minion resembling how we look at life for almost half of our years- so relatable, right? Try out a despicable nail art like this one using your nail art brushes and dotting tools.
- Try bright yellow polish on all colours except for the ring finger.
- For the forefinger and middle finger, the dominion diagram with the help of black, white and blue paints.
- Use the artistic sense and draw minions, as shown in the picture.
- For the ring finger, use purple background and other colours like black and white for drawing another minion face.
46. Beautiful Smiley Nail Art Design:
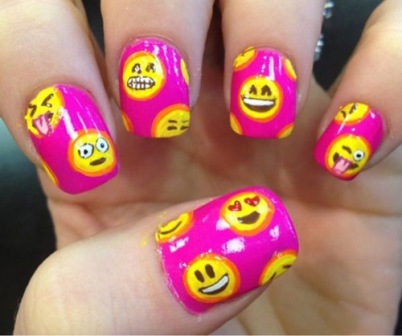
You may not get any meaning out of this nail art, but it sure looks lovely. Use your dotting tools to create this nail art. The emoticons look correctly done up, although, the pink might not favour every skin colour, so take the risk and see how it goes in the end. Will you try it?
- Use a pink background for polish, and use yellow paints to make large dots.
- Then use brown and white paints to draw smiley faces and eyes.
- This is fresh and funky paint. Finish it with a top coating.
47. Fireworks Nail Art for Girls:
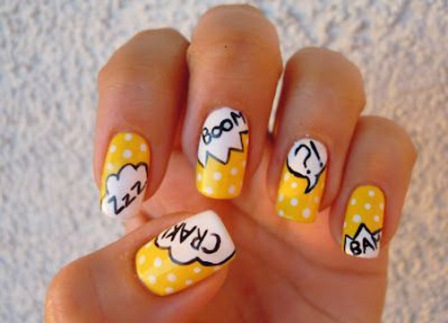
This is very chic nail art. The boom and bam nail art depicting how crackers burst can be quite a nail art for the coming Diwali. Will you try it? All you require is bright yellow and white/black paints with good texture from major brands to stay for a long.
- Use yellow and white on both ends diagonally for nails.
- Best use black to stripe out the difference.
- Use white for polka dots and black to make funky patterns.
48. Vintage Style Party Nail Arts in Red:
Try out vintage pattern party nails using two colours and striping tapes. These are cool and elegant ones for those who love to do simple art. In case you want to know nail art designs step by step at home without tools, you are here.
- Use alternatively either black or golden as a base. Let it dry.
- Put striping tapes in order of the design you want and press slightly.
- Use the contrasting colour over it. Carefully peel off the tapes and seal the design with transparent polish.
49. Candy Cane Toe Nail Designs:
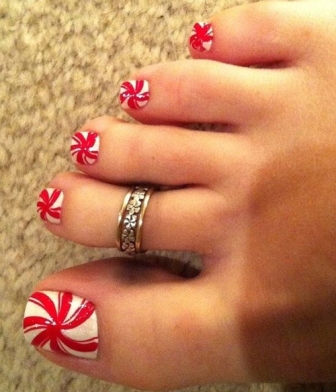
These nails are best suited for feet because feet nails are broader. This is among toenail art designs. However, you may try out the same design for your hands too. You will require a nail art brush and skills in steady freehand painting for this one. All you need here is the white and pink colour with glitter
- Use a white background first.
- Take pink paint and draw as shown here the spiral patterns with glitter, and use a finish coat.
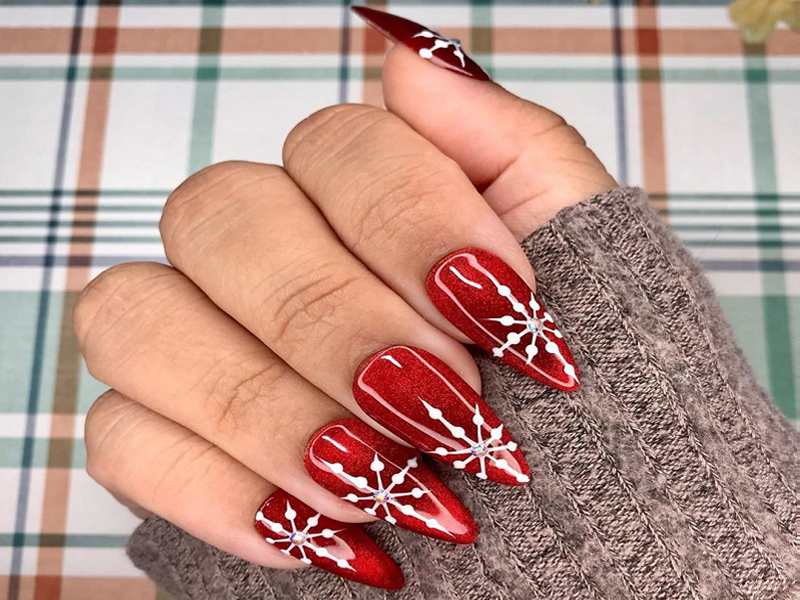
50. Christmas Santa Claus Cap Nail Designs:
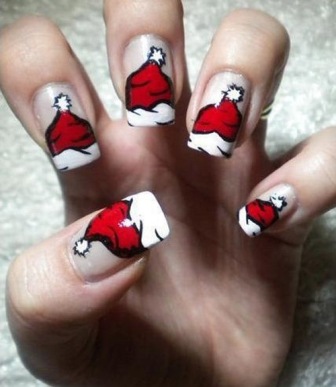
A Santa Claus cap nail art can be cute to sport for the coming December. This art is easy to create too, and a few trials can make you draw those perfect little caps on your nails. All you require is white, black and red colour nail polish.
- Use your black striper and red polish along with white polish to create those caps.
- And use a dotting tool for the cap’s head.
- Use a needle to make the fluffy cap head. Will you try it?
51. Easy Freehand Nail art Designs for Beginners:
This is quite funky. Try this out with normal paints and some freehand drawing. This is easy to do, but you will have to do this carefully. If you have problems, then you can try this out on a piece of paper, and after practising, you can do this on your nails.
- Take white and purple paint and draw half with each colour on the nails.
- Use orange to draw a striper between both, and black colour to make dots on white paint.
- This is elegant and easy to do, as well.
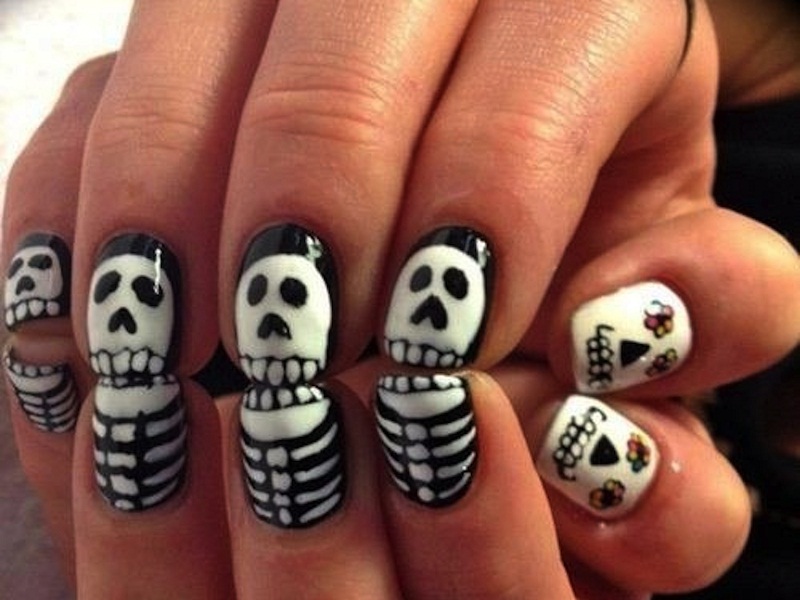
52. Halloween Nail Designs for Beginners:
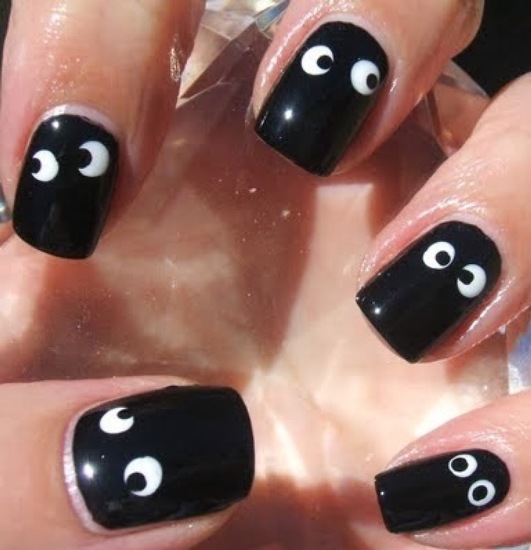
This can be worn for Halloween. And this is in fact, quite easy to do. You can wear this with dark-coloured clothes. This easy-to-do thing is apt for many beginners. You can wear this for parties. You can also have fun with your friends by wearing this.
- Do black paint all over the nails.
- Use white paint to make dots near beneath the nails to make the eyes shape.
- And use black paint again to make eyeballs.
- This is easy and does not need much effort.
- Use a transparent coat at the end to finish.
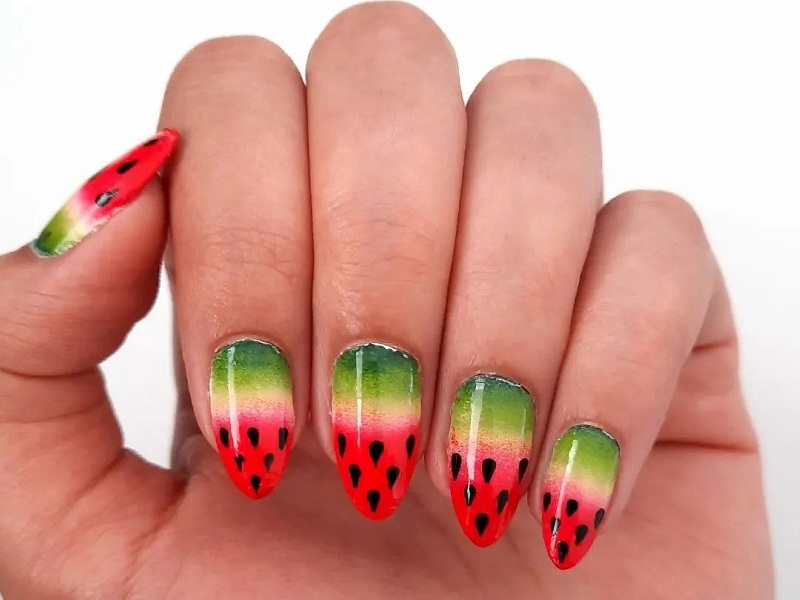
53. Summer Designs for Nails:
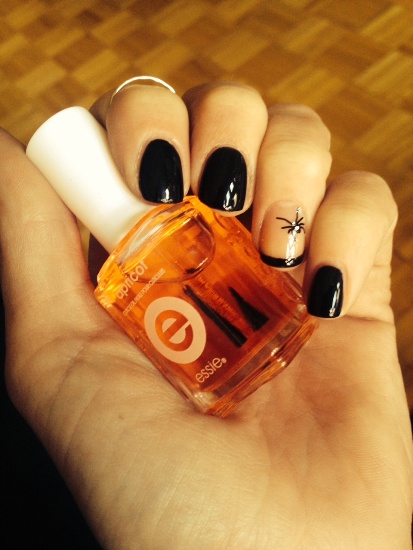
This can be done quickly. You can also use unique materials to go with this. And this can be worn with almost any form of outfit, and you will not have to wear this with only some specific getup.
- Use black paint all over the nails and for the ring finger, use beige cream colour paint with a black border.
- The black paint can also be used in a pattern stamp on the ring finger for a bit of a touch.
- Use a stone to keep in between for the look.
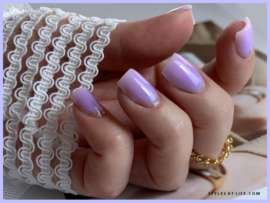
54. Simple Pink Nail Art Design for Beginners:
The nail colour is really simple, which is just what makes it classy as well. So, to bring out the very best of this look, make sure you have the right shade before you start and don’t forget that topcoat. If you are dressed as something for a costume party, you can try this out. Wear some accessories with this to make this even shower.
- Apply the colour of your choice to all fingers except the ring finger.
- You can make the pattern you like on the ring finger as shown in the picture.
- And you can mix three shades of your choice and make patterns.
55. Bugs Nail Art with Dark Background:
This can be done with dark paints and dark colours. You can make this scary and also funky, depending on your choice. As shown you can take orange, black and white colours.
- Do orange paint on all nails first.
- Use black to make dots and with the help of a toothpick, draw a spider pattern by extending the edges, and using white polka dots all over.
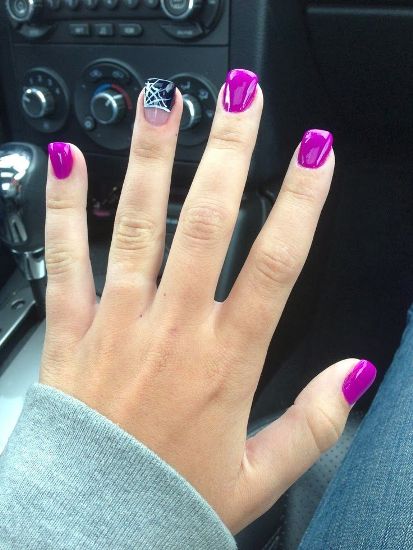
56. Latest Spider Nail Designs for Teens:
This can be done using materials, and also you can do this with a free hand. Like here it is quite glamorous though quickly done, you can also try this out even if you are a beginner.
- First, you can make a white colour background on all nails.
- Take black paint with the help of a toothpick and draw spider patterns.
- You can use creativity and leave out the ring finger for other colours or glitters.
57. Funky Coloured Hand Nails Designs:
This can be a funny thing to do. If you have time, then you should take your brushes out and some colours and start doing this for yourself. And this can be good for parties and also for any other girl’s night out. If you dare, then you can sport this for college for those times you are wearing something funky.
- Take orange and black colours and paint the nails with half each as shown in the picture.
- Take white paint and make dots on the black potion.
- Similarly, for the ring finger, you can use black paint to make a funky pattern too.
58. Latest Simple Nail Art Ideas:

This is a very girly thing that girls do. And this is quite easy to do at the same time. You can also try this out quite quickly. You can buy these from the stores which specially sell these. Then you can take a palette and put some paint of your choice on it and use the tools to create these.
- Use blue paint to use all over alternative fingernails.
- Other nails like the forefinger and ring finger can be painted black.
- Take white polish and make dots on black paint.
59. Multi Colour Polka Dot Designs of Nails:
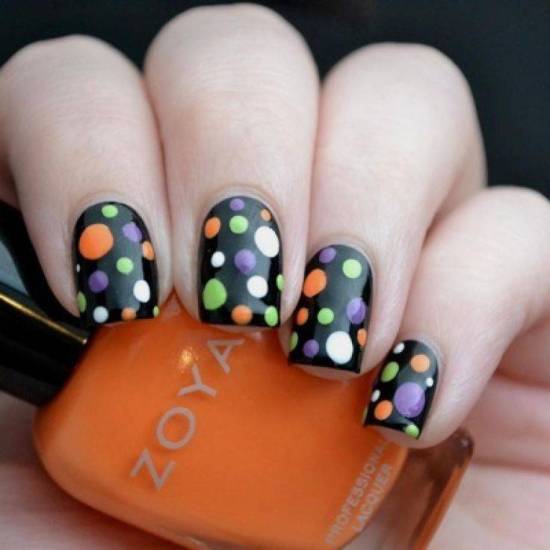
You can do this again with the tools mentioned in the image above this. This can be quite girly, and you can wear this for parties. And this can be teamed up with polka outfits and floral skirts. This requires black and some bright colours of your choice.
- Use black paint to draw all over the nails as a background.
- Make dots on the nails with bright colours of your choice.
60. Simple Polka Dot Nail Art Design for Women:
This is quite common, and you can do this even with the blunt end of a toothpick. If you want an easy thing that also looks good, you should try out something like this. And this also suits most types of outfits. You can wear this with almost all forms of dresses. All you need is orange and blue paint.
- Use orange polish for applying on all the nails.
- Take blue polish and make dots beneath the bottom side of the nails, as shown in the pattern.
- This art looks organized too.
61. Nail Art Simple Design Dots:
Floral prints are quite quickly done. You can try drawing something like this with your brushes and equipment. All you need is red and white paint. This art has a girly look to it and is simple too.
- Apply white and red paints alternatively.
- Similarly, use the paints to apply dots on the nails alternatively.
- This art is easy to do and is among simple nail art designs.
62. Black and White Nails Art Design:
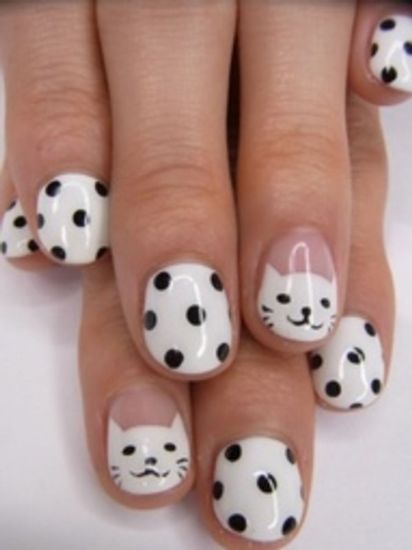
Funky prints are quite common. These types of prints can be suitable for girls who want to dress up in girly outfits. These are also good if you want to wear something that has heavy zari work or some glittery work.
- All you need is white and black polish.
- Apply white polish on all nails and use black polish to make dots.
- For a ring or forefinger, you can get a bit funky and make a cat-shaped design with the help of toothpicks.
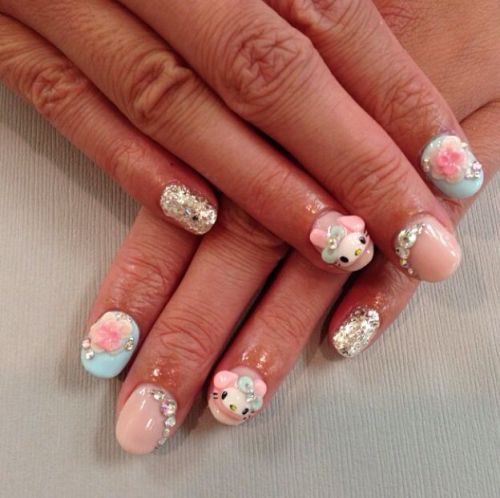
63. Gorgeous Nail Art for Weddings:
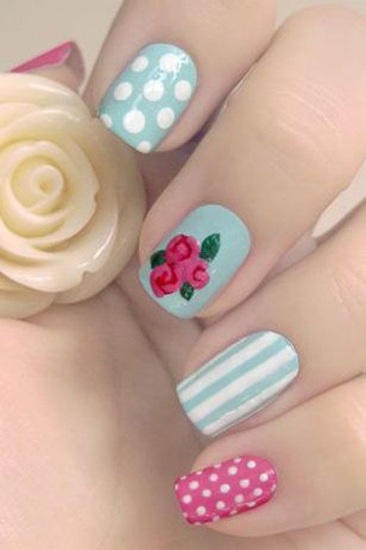
This is a very glamorous design. Though this is quite easily done and you can try this at home, even then you can wear this for almost all occasions like parties and college.
- You need blue, pink and green polish with white paint too.
- Apply as shown in the picture above colours alternatively and make patterns with white/blue polishes.
- Make flowers on the forefinger nail with the help of pink and green polish.
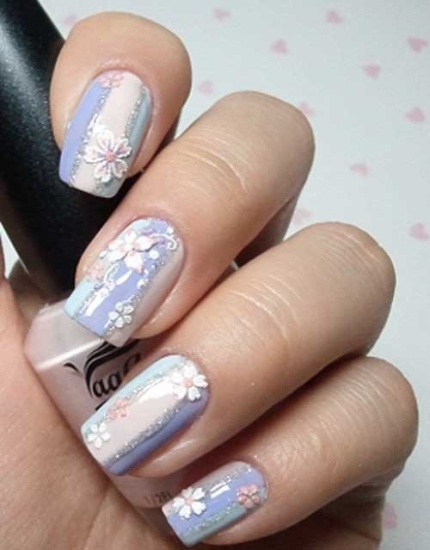
64. New Trendy Nail Art Design:
You can use some freehand painting to do these. You can also buy decals for doing these even more professionally. These can be worn for regular wear and also for parties. You can wear these with a polka and a printed outfit. This looks quite girly. You can also wear these with some other materials like ceramic flowers.
- Take blue, black and white nail polishes.
- Apply turquoise blue polish to all nails, except for the middle and thumb fingers.
- And apply white polish to those nails.
- Make dots with black and blue paint on those forefinger and thumb fingers.
65. Latest Nail Art Using Decals:
You can buy decals and use them. These are easily transferable with plain water, and you can wear this for regular wear. All you need is white and some bright colour nail polishes.
- Apply white nail polish on all the fingernails.
- Take bright colours of your choice and apply dots on top of the fingers, as shown in the picture, making it look like a pattern.
66. Matte Nail Design for Parties:
These can be easily bought if you spend a few bucks. These stones are quite costly, depending on the shape and colour. If you want something for a party, then you should try something like this to get the right look.
- Take black and white colour polish and apply a base to the fingers as shown in the picture.
- To take glitter and stones and decorate two nails, as shown in pictures with stones.
- It is super easy to do and does not require any effort.
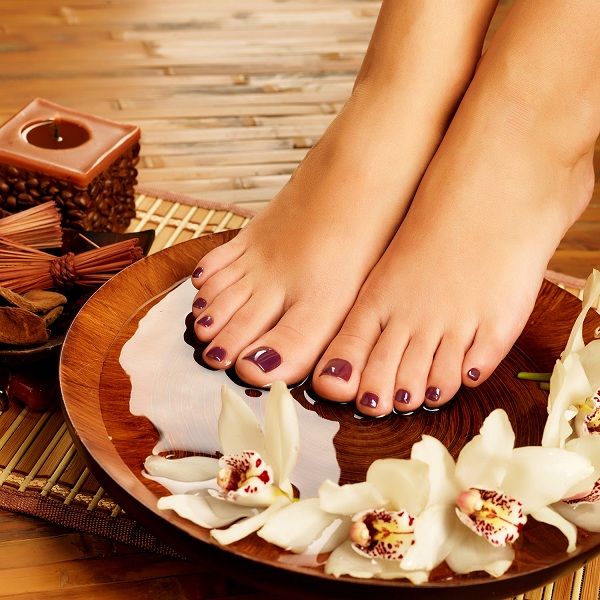
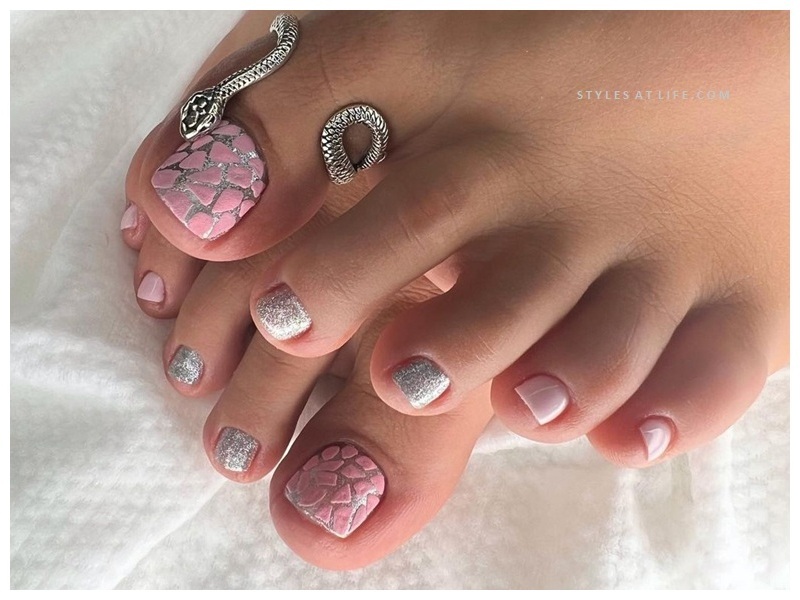
67. Beautiful Toe Nail Art Designs:
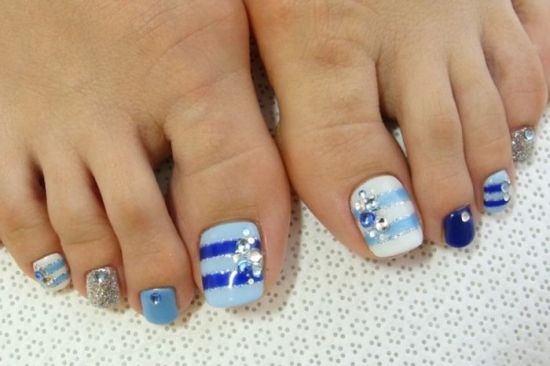
This material is often available in crafts supply stores, and you can easily make these. This art is quite suitable for parties. You can wear these to college and work. You require blue (dark and light shades) and glitter for this polish.
- Apply two blue shades, as shown in the pictures alternatively.
- And apply dark blue polish in a form of horizontal stripes on the main fingernail. Do this for the last one too.
- Use glitters on last, but one nail of the toes and keeps stones all across for the look.
68. Nail Designs for Night Parties:
If you are having a girl’s night party, you can try wearing something like this. This is quite easy to do. You will be able to sport this easily. You can also wear this with sequined outfits.
- Take white and black nail paints and apply them alternatively.
- To take rhinestones and design them on top and beneath the nails, as shown in the picture.
69. Traditional Nail Art Designs with Stones:
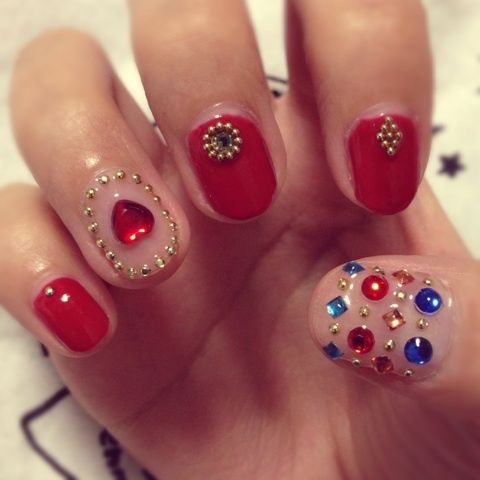
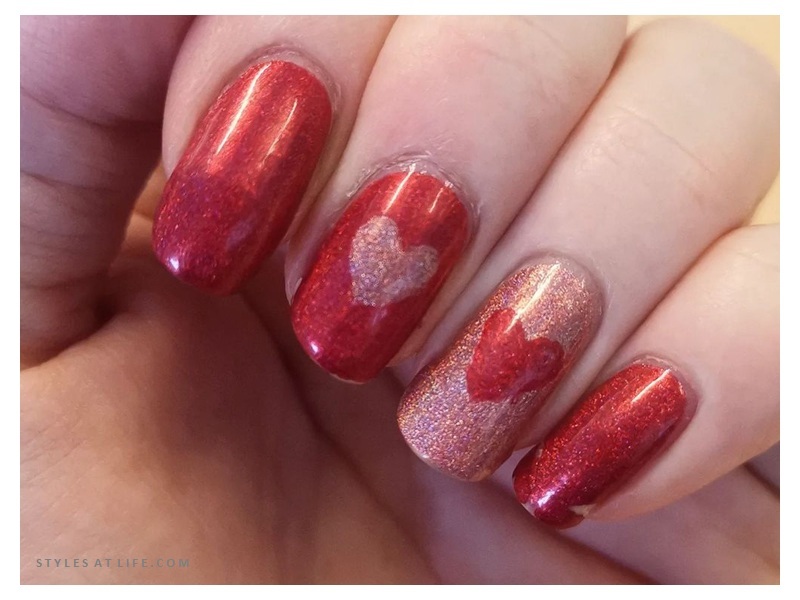
This is quite easy to do. You can follow the simple procedure of dabbing a sponge or makeup sponge and then do this. Use a clear base to protect these and a top coat to seal this. You can combine colours like this any that you may like and then use a sponge or a felt tip to create this effect. This is quite trendy, and you can easily wear this with your friends. You should be able to sport this with much ease.
- Take red paint and apply it on nails except for the thumb and ring finger.
- For those fingers, apply a light pinkish shade which is almost transparent.
- Apply rhinestones on those fingers for the look.
70. Cute Nails Design:

You can add more glamour when you are wearing something like this. This art is trendy and will suit most girls. You can wear this with almost all types of floral prints.
- Apply grey nail polish on all nails.
- For the ring finger, take stones and decorate them as shown in the picture for the look.
71. Unique Nail Art Design:
You can sport this look even on the most difficult nail types, without making the whole arrangement look like a mess. This can also be easy to do with selected colours. You can wear this for parties teamed with some multi-toned skirts.
- Take pink and black polish for this nail art design.
- Apply black nail polish on the little, middle and forefinger.
- For the thumb and ring finger, apply pink polish (lighter shade).
- Take blue polish and a toothpick to draw the design on those two fingers as shown in the picture.
- To take black stones to decorate them as well.
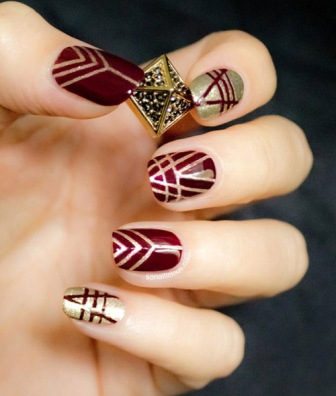
72. Party Wear Nail Art Design:
If you have good drawing hands, then doing something like this should not be a problem as these are quite easy to do. You can wear this easily for parties. Thanksgiving can celebrate with this nail art.
- This requires different shades of brown and gold, black and glitter.
- As shown in the picture, apply paint alternatively with black and brown shades.
- Apply glitter too for the look and decorate them with stones.
73. Easy Nail Paint Designs for Beginners:
This can be done quickly and looks quite girly. And this will go with almost any summertime outfit. You can draw some leaves at the sides using your brushes. Then you should use some top coat to seal it, and else it may get messy. Take white and yellow paint here
- Apply white nail polish all over.
- Use yellow to make bright shapes at corners, as shown in the picture.
- Take a toothpick as required to draw the pattern above.
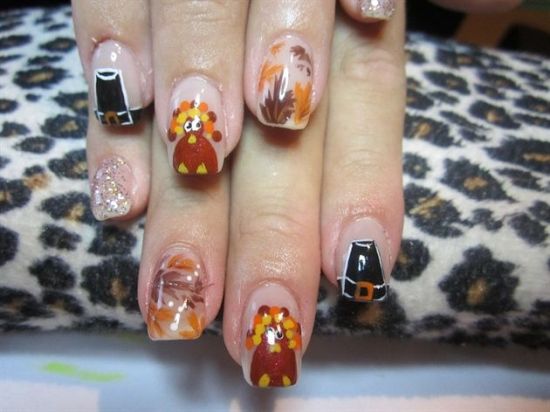
74. Thanksgiving Autumn Nail Art:
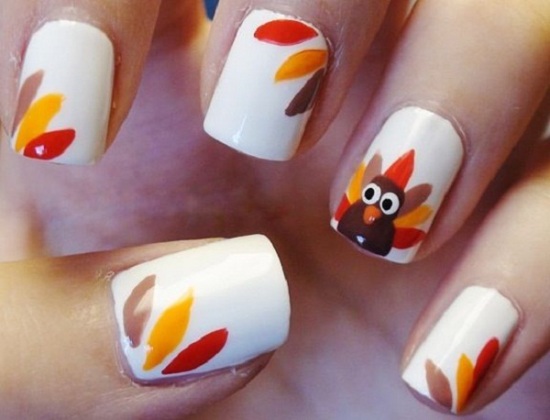
This is quite an easy thing to do. And this can be quite quickly done. You should be able to do this with normal paints and colours. If you have a thin pointed brush, then it should not be a problem to get this done.
- Apply white polish all over the nails.
- Take brown, yellow and red colours and draw in the shape of petals as shown at the corner of the nails.
- For the ring finger, you can get creative and make the design of a bird too.
- Use a toothpick to make thin edges of the shapes.
75. Different Designs of Nails:
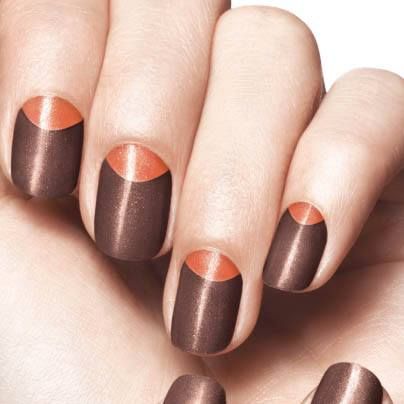
This design is easy to do a thing, and you can wear this for a day out shopping with your friends. You will have to use selected colours and paints from your drawing kit, and then you can do this easily. If you are worried that you do not have good drawing hands and you may not be able to do this, then you can practice this on paper and then do this on your nails.
- This elegant nail art design can be done with brown and dark orange colours.
- Apply nail polish in brown colour all over and at the edges, apply a dark orange colour.
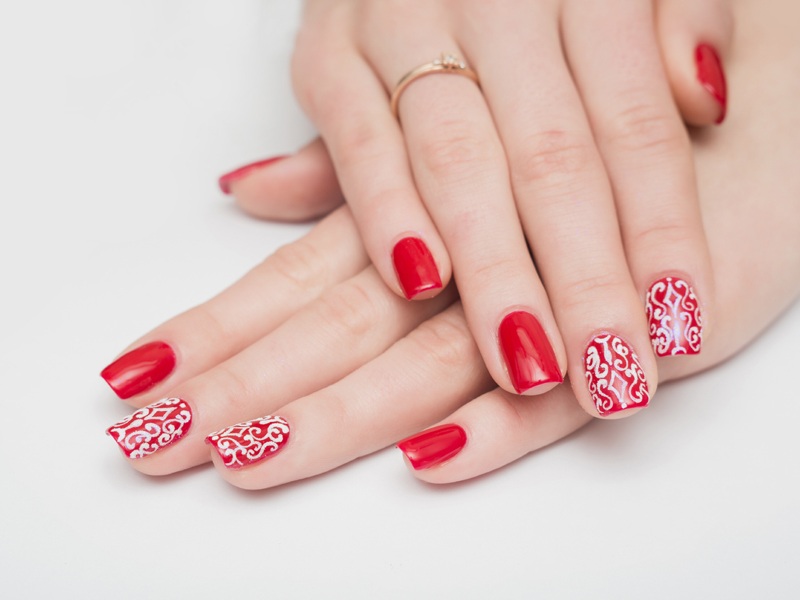
76. Thick Red Nail Designs with Jewellers:
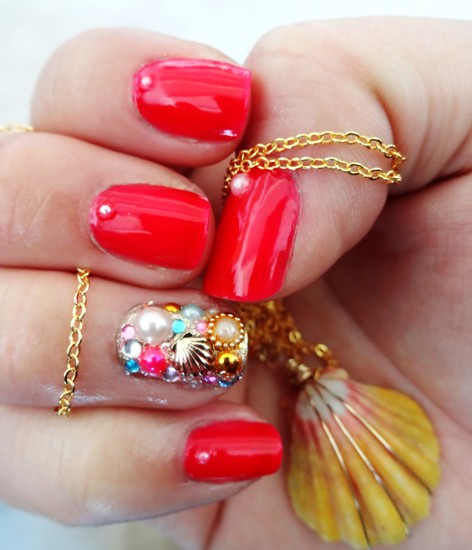
Pearls can be easily bought from crafts stores. It will cost you very little, and it is quite cheap. You can use these with a special adhesive which also you can get from unique supply stores and which does not harm the enamel. If you think that you have brittle nails, then you should use a thick base coat before you use. You can add some freehand painting to these. These are quite easily done and easy to sport. You can also wear some metal chains with these. You can buy those from the stores that specially sell those.
- Just apply a red colour all over the nails.
- For the ring finger, decorate it with stones.
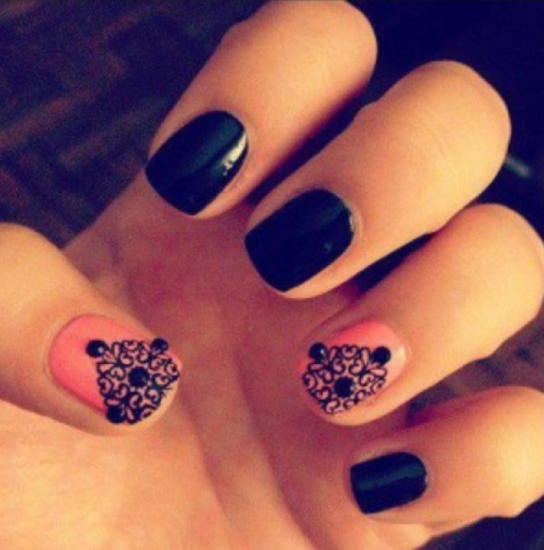
77. Black Nail Art Designs with Pearls:
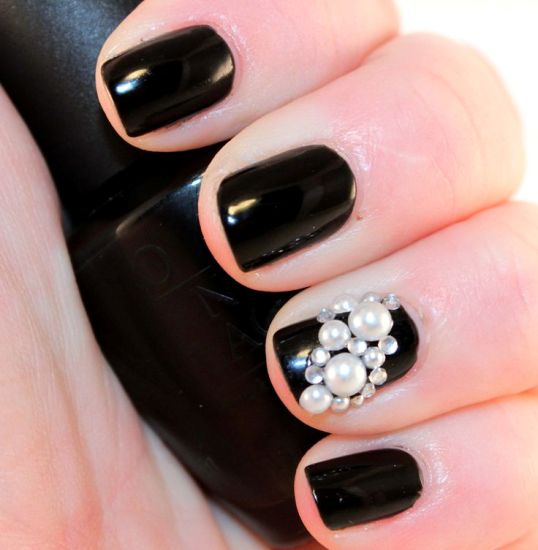
This can go with almost any form of outfit. And this is easy to do, and you can wear this for parties. You can also wear these for regular work if you keep the base colour slightly neutral. You can centrally place pearl beads and then use a top coat to create patterns. These are quite showy if you want to wear these for your college.
- This design is the same as the last design.
- Apply black colour all over and stick white stones for the ring finger.
78. Light Pink Nail Art with Rhinestones:
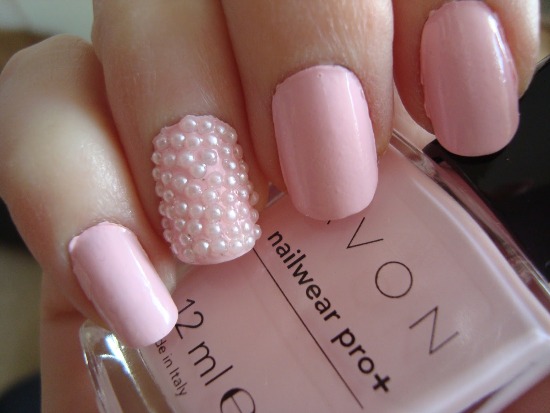
This design can do with any other chosen colours of your choice. Do not forget to use a thick layer of top coat or use a single layer and then wait and then use another to seal these things in so that they do not fall off. You can use other deco materials along with this to give it more glam. You can wear Rhinestones with this to provide it with a more party-like look.
- Use pink colour shade all over in nails and take white stones for the look here.
79. Zoya Nail art with Pearls:
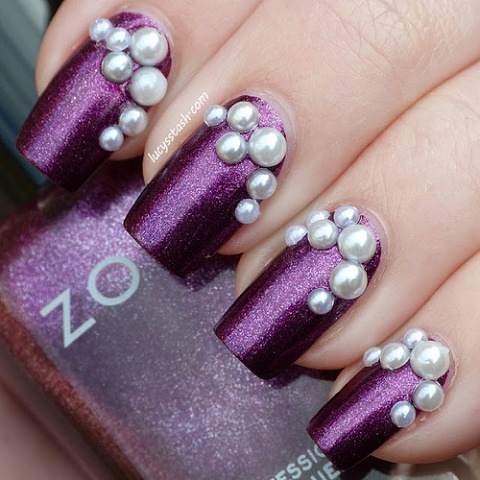
This is quite easy to do. You can do this even if you are a beginner. Then you can wear this for college as well as you can try doing these with your friends for times that you have a girl night party. You can use some decals with these. These can be worn with your heavy suits and also with chiffon saris.
- Apply purple nail polish with glitters all over.
- Then apply white stones in the nails at the corners ends.
- You can also add chains and small Rhinestones to these.
80. Glitter Nail Designs for Family Functions:
Who does not like glitters? Almost every girl likes some glittery effect. You can wear this for college as well where you can team this up with your party dresses which have sequin works on them. If you want, then you can wear this for family functions. You will have to buy some loose glitters for this, and then you can apply a topcoat and dust those on them to create something like this.
- This design requires glittery transparent nail polish and some stones.
- Take decorative stones to the ring finger.
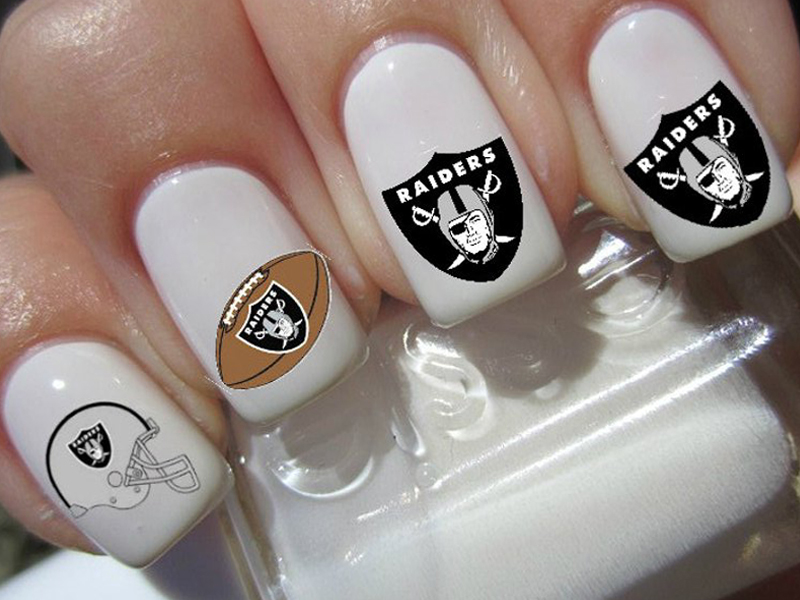
81. Awesome Beach Anchor Nail Design:
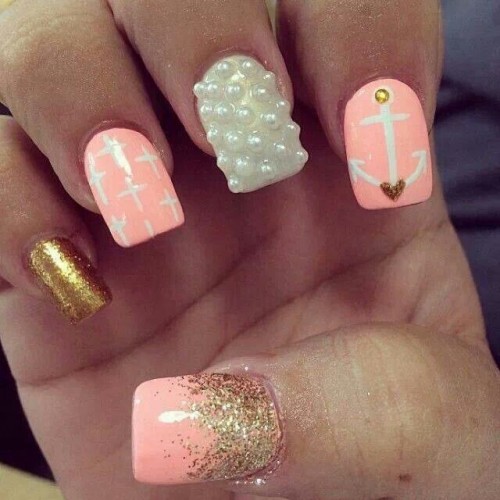
This can be a party thing. If you want something for a show or you want to sport something that you think can be good for those times that you wear a sequined outfit, then you should wear this. And this is properly set and can be useful.
- Apply pink nail polish on all fingers except the little and middle fingers.
- Use white nail polish to make patterns on the ring and forefinger.
- And use glitters for the thumb at the edges.
- Similarly, use the same glitter paint for the little finger.
- Use stones for forefinger here to add to the look.
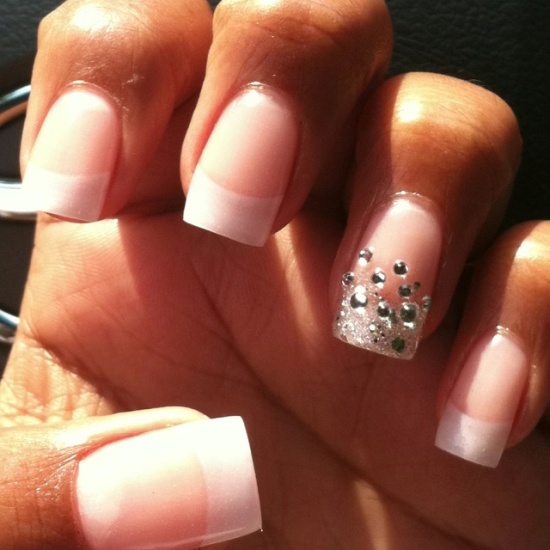
82. Light Pink and Gold Nail Design:
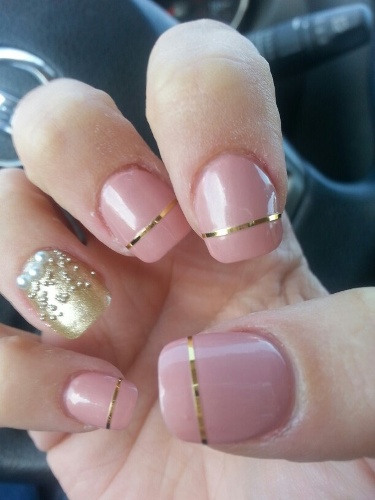
This nail art can be teamed up with something classy. You can wear this, and beginners can create this. If you want, then you should try adding more materials to this. However many people find it difficult because materials can get stuck to clothes and can come off. So you have to wear these as per your comfort.
- Apply light pink shade polish to all fingers except for the ring finger.
- Use glittery gold polish on the ring finger and decorate it with stones.
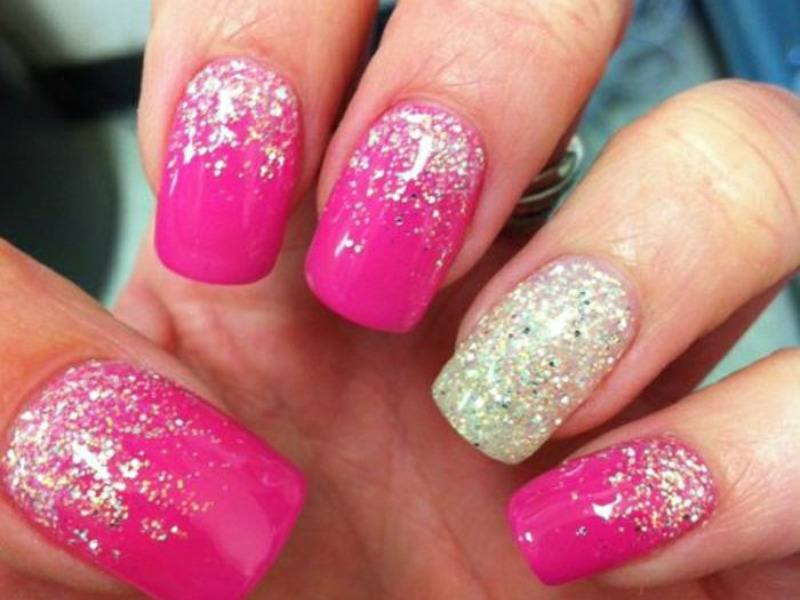
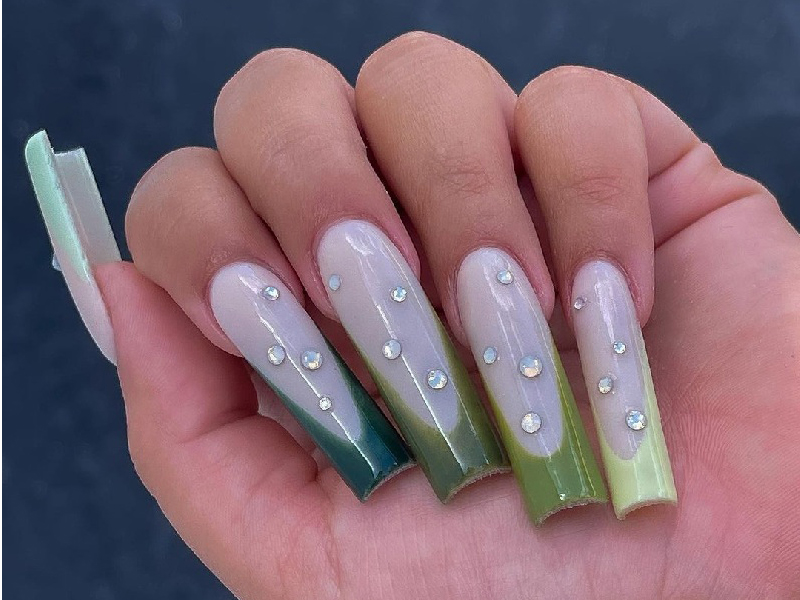
83. Glitter Nail Art Designs for Long Nails:
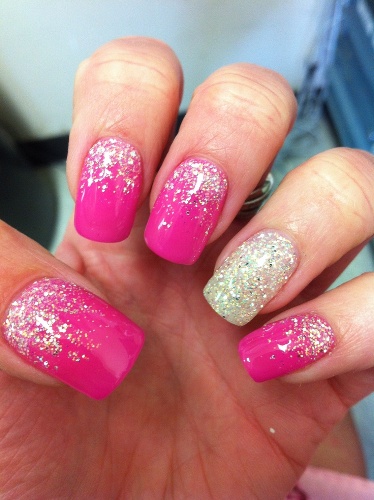
Properly choose what you want to set and then use a clear topcoat to seal those in. It can be suitable for parties as well. You can use any coloured glitters that you want. Sometimes it can be difficult to find paint colours which suit the clothes that you want to wear for your party or a function. In those cases, you can use any base colour and then use the colourful glitters that you wish to over them.
- All you need is pink polish and some gold glitter.
- Apply glitters all over on ring fingernails.
- Rest of the nails, apply glitters on the pink polish background for the look.
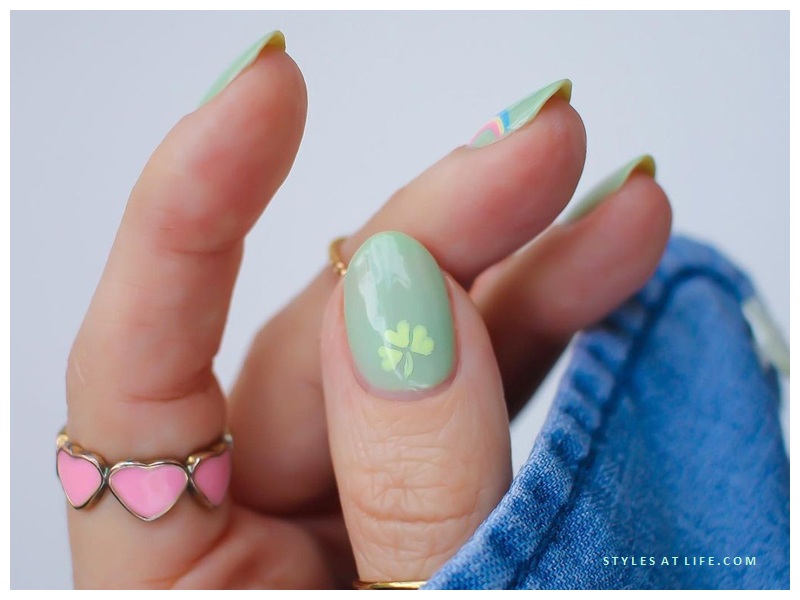
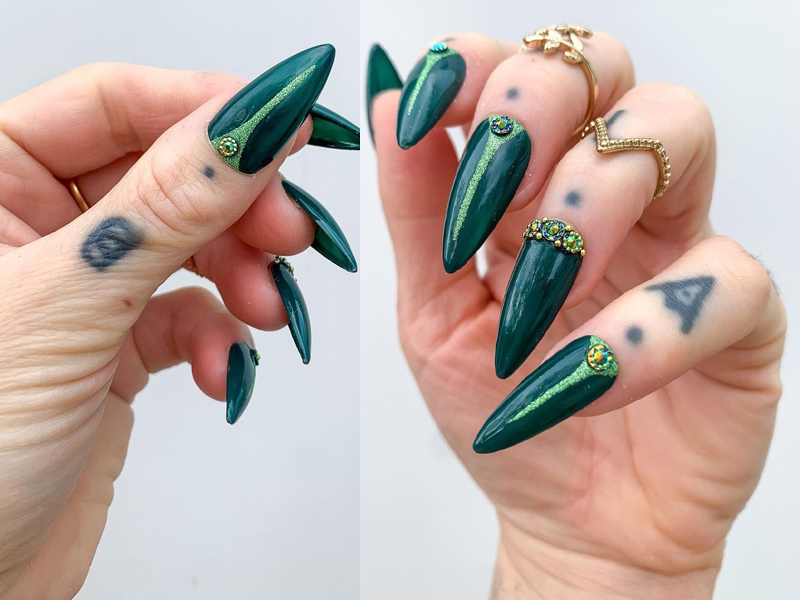
84. Best Nail Art Love Design:
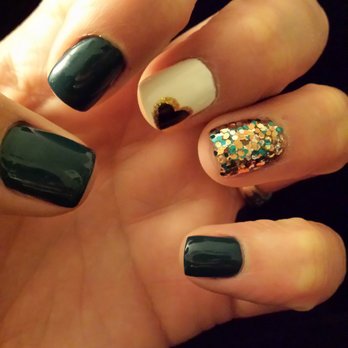
If you choose a colour properly, then you can wear it without almost any materials. This design can be good with dark-coloured outfits. You can wear this when you have a proper manicure done with almost any dress for casual days. You can wear this to work and also to college.
- Apply green polish on all nails except the middle and ring fingernails.
- Use gold glitters to design the ring finger with green polish.
- For the middle finger, use white polish and green can be used to make a small design.
85. Diamond Nails Design:
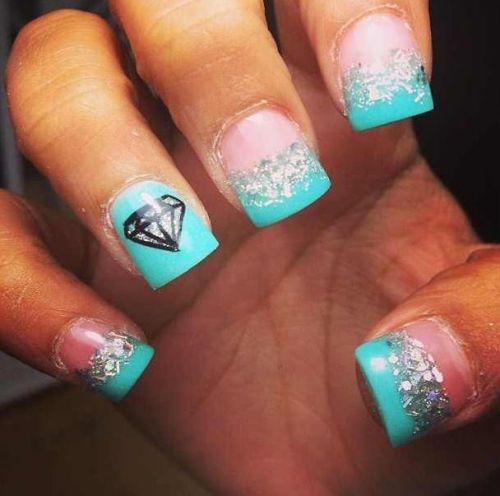
This can be a good and new thing which many people are wearing. These are quite popular. You can buy these from stores and easily wear these. Quite a few colours are there from selected ranges which can look very glamorous like this.
- This art requires blue, black and silver glitter.
- Apply blue polish as shown in the picture with full or half of the nails.
- Then add glitter to the nails on the edges of the polish.
86. Black Glitter Nail Art Design:
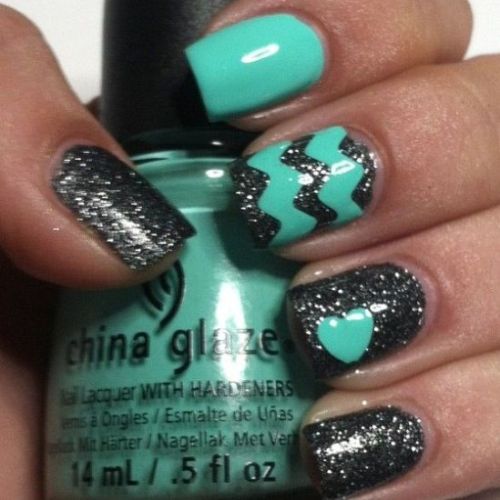
You can wear this quickly. It is a very plain colour, but it can be worn with some coats and then use as a top layer to make this more glamorous. This can be good for summer. And a team with glitter-printed outfits.
- Add black glitter polish on all nails.
- Take turquoise blue paint and make some patterns on the middle and ring finger as shown in the picture for the look.
87. Matte Nail Polish Design:
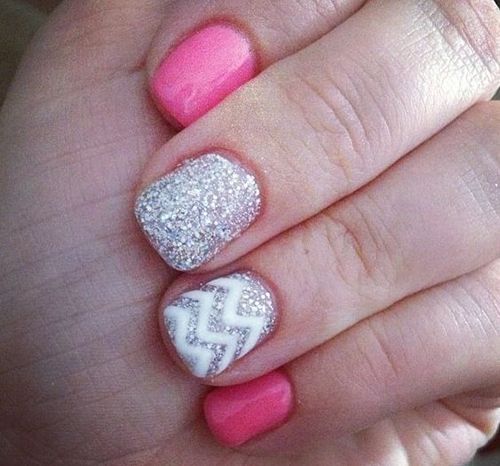
Not everyone likes to use materials. If you select a colour that you can wear and which is either matte or glossy, then you can use some coats of it and then wear that for parties. That also looks quite good. You can wear that for work, and also for shopping days and also for college.
- Take pink and silver glitter polish.
- Apply pink polish on all nails except for the middle and ring finger.
- Finally, apply silver glitters over there.
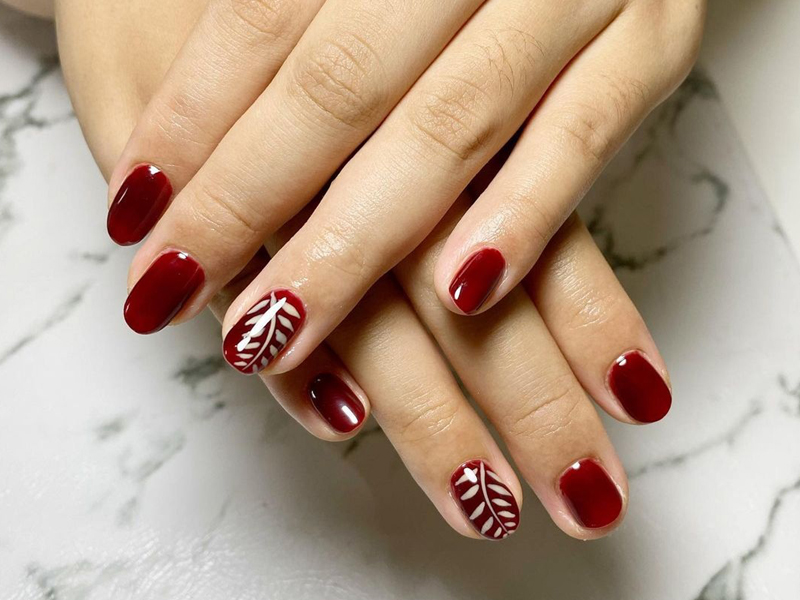
88. Designer White and Red Nail Paint:
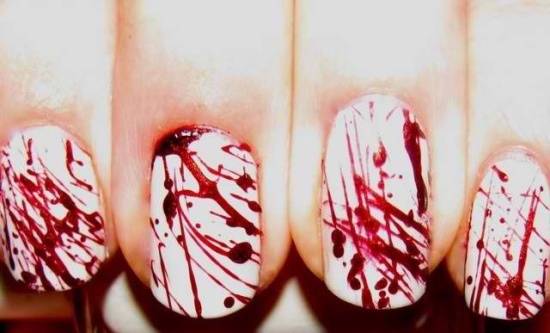
You can try these out with a brush and some paints. You can also use a toothbrush to do this. Usually, these are very easy to do and quite suitable for sport with almost any form of outfit. You can wear this to college as this looks trendy and you can also wear these to your parties.
- This easy nail art design requires white nail polish first.
- Red polish can be taken with the help of, and random patterns can be made.
- Thus the look is created.
89. Creative Summer Nail Designs:
This is a very easy design to create. You can wear this for daytime occasions when you are going shopping with your friends. And you can also wear this with almost any form of outfit. You can have something similar done when you want to use something for summer.
- Take white nail polish all over on background in the nails.
- Take bright colours of your choice like red, blue, pink and green and make a toothpick to get random lines right.
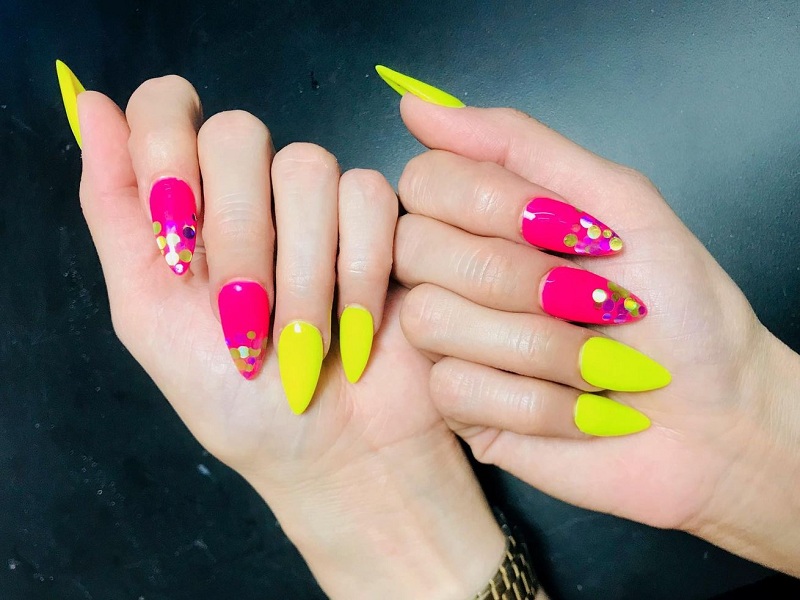
90. Neon Coloured Paint Nail Art:
You can easily do this even if you have no experience in doing nail art. You can team this up with almost any form of floral or polka outfit. Using neon colours will also look quite showy for something like this. This design is quite glamorous and very easy when you try it.
- Take black and dark maroon nail polish here.
- Use maroon all over the finger with glitter nature.
- Then use black nail polish at the corner edges.
91. Nail Paints for Beginners:
This is quite trendy, and you can do this with any selected colours. You can also wear this for any get-together, and you can also wear this for parties. This is quite easy to do, and even beginners can try this.
- Take colours of your choice or as shown in the picture.
- Just make a white background with white nail polish.
- Mark the bright colours and use a toothpick to draw them out randomly.
92. Nail Design for College Girls:
This can be suitable for a party. If you are a beginner, then you should try this out. This is easy to do. Special materials can be stuck after you have done this. This design is quite showy and suitable for even work wear or college wear.
- This art just requires a beige background polish.
- Red polish can be used, and a toothpick or pin can be used to draw random lines.
93. Mixed Coloured Nail Design:
Use some selected colours and diluted formations to create this. You can split with straws as well. You can also use some special paints to do this. These are very easy things that a person can try out.
- All you need is white nail polish at first as a background.
- Then use colours and make tiny dots. Take a toothpick and draw outlines from those other colour dots to make splashes of colour.
94. Asian Nail Art for Women:
This is an Asian style, and you can easily do this on your hands. You will need these deco materials, and you can fix these to get this done. This nail art can be useful for a party, and you can easily sport this. You can also use other materials like stones and pearls, to make this.
- Use pink and light purple nail polish first all over alternatively.
- Then use black polish to create stars in between the middle two fingernails.
- Keep golden stones to decorate further.
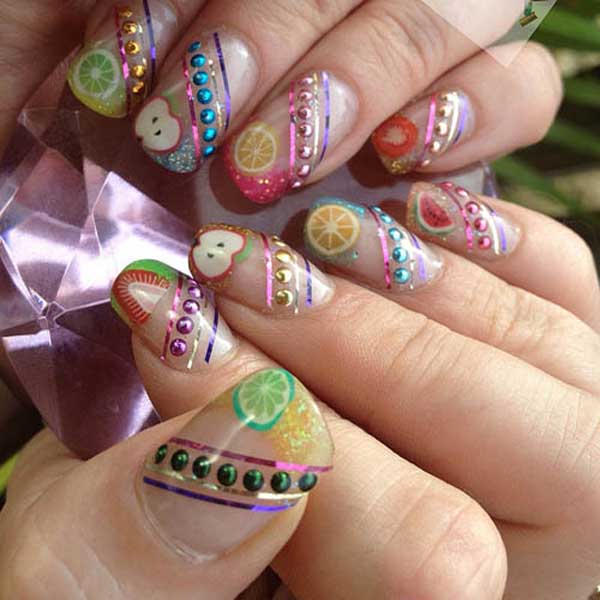
95. Nail art Designs Using Foils:
This design can do with special foils and materials that you can buy from stores that sell these. These are easy to apply and use. You can do this even if you do not have a number of materials. This nail art can look good for a party.
- All you need is translucent nail polish first and some rhinestones.
- Use stones to decorate all nails.
- You can take some nail materials from the picture as shown and stick them to the nails.
96. Fimo New Nail Designs:
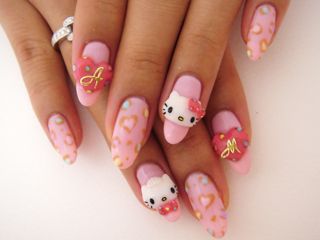
This is a party-type thing, and you can use Fimo easily to get this, or you can use materials like those shown in the image. And this is easy to understand and easy to do. You will need to do this carefully, and you can buy a special adhesive to stick these.
- Use pink nail polish all over at first.
- Then use white polish and gold to make dots in random shapes.
- Use materials, as shown in the image to be glued in between.
97. Latest Free Hand Design for Kids:
This design is another glamorous combination of materials and paints combined with some freehand techniques. You can wear this for a party and even to your college. This is quite easy to do, and the materials are also not that costly.
- Apart from glitter polish on all nails, you require some beautiful materials of your choice.
- Those materials are to be glued to fingers along with some coloured stones.
98. Nail Design for Kitty Parties:
This is for all those party times when you want to wear something easy to do and you can sport this as well. If you are going to a function, you can make this and wear this. This is also good with polka-dotted printed clothing. You can easily wear this.
- Use dark pink materials and stones.
- Then use them to glue them to the nails to get that look.
99. Nail Design with Special Materials:
This can be done with unique materials which you can buy from crafts stores. You can also get these from stores that specialize in them. If at all you cannot find these then you can ask for something from a parlour. They will be able to give you something like this easily.
- All you need is blue and pink polish to apply to the nails as shown in the picture.
- Then use stones and some cute materials and glue them to the nails.
- Use glitter paint on a little finger for further touch.
100. Fimo Nail art for Wedding:
If you are a beginner, then you should try this. This art is quite easy to do. You can do this with some foils as well you can do with some Fimo. These are very easily available and quite cheap to buy. You can use other materials like pearls and stones. You can also use decals to create something like this.
- Apply purple, or blue kind of nail shade first.
- Use stones and flower materials to glue to nails.
- Apply grey or light blue shade polish on the vertical corners of nails for a look.
Additional Tips:
- Do a manicure once a month to maintain your nails well. Make sure to take care of them.
- Remove the dirt from nails regularly and remove the white corners on nails easily by using glycerin or similar liquids.
- Remove nail polish and let the nails be free to breathe air once a week at least, for a while.
- Make sure to trim the nails regularly.
- Even if one is unable to draw freehand, there are several nail art kits available, which can be used easily to create beautiful designs.
Overview:
Hope you liked the latest nail art designs in this article. These designs are not tough and can easily be done by all. They are comfortable and can be customized to our liking. Let us know what you think of them in your comments.
Frequently Asked Questions and Answers:
1. How to easily maintain and clean nails before and after nail art?
After doing a nail art design and before trying out the next design, use petroleum jelly to apply on nails before you keep nail art for better texture and moisture. They help to clean up as well as easily.
2. How often is a manicure required in a month?
Once or twice a month is suitable as per your designs and nail polish art along with the usage of nails for colour shades. Generally, a manicure once a month on average is decent enough
3. Are regular nail polish and art designs bad for nails?
In case you maintain your nails well, regular nail art designs are not evil. Make sure to clean up nails thoroughly between and leave a day for the nail to get a breathing space in between before trying out the next design.
4. Can we use our ordinary nail polish to create these nail art designs?
Normally the nail polishes are very thin, and there are however thicker nail polishes available which are better when used for nail polish art.
5. How long will nail art designs last?
They will last as long as the usual nail polishes we use, and the only criteria are to be careful, especially if stones or glued to the nails.


reecha
Wow! Brilliant and classic Designs. Interesting write-up. Do share more such amazing articles. Will keep digging for more..
sneha
Totally loved these designs. They are so many I loved and want to try them on my nails. The designs are simple and awesome. Great job done!